
Internet Router Hardware Guide


Installing the Router without a Mechanical Lift
WARNING: The procedures in this section apply only to initial installation and
assume that you have not yet connected power to the router. If p ower is connected,
completely disconnect it before continuing. See “Disconnecting Power from the
Router” on page 200.
If you are installing or replacing components in an operational router, see
“Replacing Hardware Components” on page 139.
Do not stack components on top of one another after removing them from the
chassis. Place each one individually on a flat, stable surface, either on an antistatic
matorinanelectrostaticbag.
Set the removed components far enough away from the installation site that they
will not be in the way as you lift the chassis into the rack.
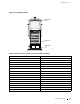
Perform the procedures described in the following sections to remove components
from the chassis, first from the rear and then from the front:
Removing the Power Supplies on page 86
Removing the Rear Component Cover on page 86
RemovingtheSFMsonpage87
Removing the MCSs on page 88
Removing the PCGs on page 89
Removing the Routing Engines on p age 90
Removing the Rear Upper Impeller Assembly on page 91
Removing the Rear Lower Impeller Assembly on p age 92
Removing the Fan Tray on page 93
Removing the FPCs on page 94
Removing the Front Impeller Assembly on page 96
NOTE: Do not remove the circuit breaker box or the Connector Interface Panel (CIP).
This chapter does not include instructions for removing these components.
Removing Com ponents from the Chassis 85