
Internet Router Hardware Guide


Chapter 6
Unpacking the Router
This chapter explains how to unpack the router and verify the parts received.
Before beginning, prepare the installation site as described in “Preparing for
Router Installation” on page 5 9 and review the safety information in “Safety a nd
Regulatory Compliance Information” on page 221, especially “General Safety
Guidelines and Warnings” on page 224 and “Installation Safety Guidelines and
Warnings” on page 239. This chapter discusses the following topics:
Tools and Parts Required on page 77
Unpacking the Router on page 77
Tools and Parts Required
To unpack the router and prepare for installation, you need t he following tools:
Phillips (+) screwdriver, number 2
1/2-in. or 13-mm open-end or socket wrench to remove bracket bolts from
the shipping pallet
Blank panels to cover any slots not occupied by a component
Unpacking the Router
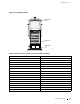
The router is shipped in a wooden crate and bolted to the pallet that
forms the bottom of the crate. The crate also contains an accessory
box, the handle used during manual router installation, and the M160
Internet Router Installation Quick S tart poster.
NOTE: The r outer is maximally protected inside the shipping crate. Do not unpack
it until you are ready to begin installation.
To unpack the router, perform these steps:
1. Move the s hipping crate to a staging area as close to the installation site as
possible, but where you have enough room to remove the system components.
Unpacking the Router 77