MX960 Ethernet Services Router DC Power Supply Installation Instructions 19 October 2007 Part Number: 530-017577-01 Revision 2 This document describes how to remove and replace a DC power supply on a Juniper Networks MX960 Ethernet Services Router. Contents DC Power Supply ............................................................................................2 DC Power Supply Electrical Specifications ................................................2 DC Power Supply LEDs .............................
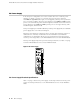
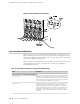
MX960 Ethernet Services Router DC Power Supply Installation Instructions DC Power Supply In the DC power configuration, the router contains either two or four DC power supplies (see Figure 1 on page 2), located at the lower rear of the chassis in slots PEM0 through PEM3 (left to right). You can upgrade your DC power system from two to four power supplies. The DC power supplies in slots PEM0 and PEM2 provide power to the lower fan tray, DPC slots 6 through 11, and SCB slots 1 and 2.
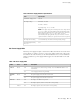
DC Power Supply Table 1: DC Power Supply Electrical Specifications Item Specification Maximum output power 2800 W DC input voltage Minimum: –40 VDC Nominal: –48 VDC Operating range: –40 to –72 VDC NOTE: If the input voltage from the DC power source drops below -37.5 to -39.5 VDC, the routing platform automatically shuts down. During automatic shutdown, the circuit remains active. When the input voltage returns to –43.0 to –44.
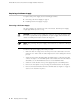
MX960 Ethernet Services Router DC Power Supply Installation Instructions Replacing a DC Power Supply To replace a DC power supply, use the following procedures: ■ Removing a DC Power Supply on page 4 ■ Installing a DC Power Supply on page 7 Removing a DC Power Supply The power supplies are located at the rear of the chassis. Each DC power supply weighs approximately 3.8 lb (1.7 kg). CAUTION: Do not leave a power supply slot empty for more than 30 minutes while the router is operational.
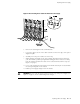
Replacing a DC Power Supply Figure 2: Disconnecting Power Cables From the DC Power Supply 6. Remove the cable lugs from the terminal studs. 7. Loosen the captive screw on the cable restraint on the lower edge of the power supply faceplate. 8. Carefully move the power cables out of the way. 9.
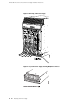
MX960 Ethernet Services Router DC Power Supply Installation Instructions Figure 3: Removing a DC Power Supply Figure 4: Top of the Power Supply Showing Midplane Connector 6 ■ Replacing a DC Power Supply
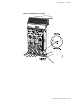
Replacing a DC Power Supply Installing a DC Power Supply To install a DC power supply, follow this procedure (see Figure 5 on page 9): 1. Ensure that the voltage across the DC power source cable leads is 0 V and that there is no chance that the cable leads might become active during installation. CAUTION: You must ensure that power connections maintain the proper polarity. The power source cables might be labeled (+) and (–) to indicate their polarity.
MX960 Ethernet Services Router DC Power Supply Installation Instructions ■ Attach the positive (+) DC source power cable lug to the RTN (return) terminal. ■ Attach the negative (–) DC source power cable lug to the –48V (input) terminal. NOTE: The DC power supplies in slots PEM0 and PEM1 must be powered by dedicated power feeds derived from feed A, and the DC power supplies in slots PEM2 and PEM3 must be powered by dedicated power feeds derived from feed B.
Replacing a DC Power Supply Figure 5: Installing a DC Power Supply Replacing a DC Power Supply ■ 9
MX960 Ethernet Services Router DC Power Supply Installation Instructions Figure 6: Connecting DC Power to the Router List of Technical Publications Table 3 on page 10 lists the software and hardware guides and release notes for Juniper Networks J-series, M-series, MX-series, and T-series routing platforms and describes the contents of each document. Table 4 on page 15 lists the books included in the Network Operations Guide series.
List of Technical Publications Table 3: Technical Documentation for Supported Routing Platforms (continued) Book Description CLI User Guide Describes how to use the JUNOS command-line interface (CLI) to configure, monitor, and manage Juniper Networks routing platforms. This material was formerly covered in the JUNOS System Basics Configuration Guide. Feature Guide Provides a detailed explanation and configuration examples for several of the most complex features in the JUNOS software.
MX960 Ethernet Services Router DC Power Supply Installation Instructions Table 3: Technical Documentation for Supported Routing Platforms (continued) Book Description VPNs Provides an overview and describes how to configure Layer 2 and Layer 3 virtual private networks (VPNs), virtual private LAN service (VPLS), and Layer 2 circuits. Provides configuration examples. JUNOS References Hierarchy and RFC Reference Describes the JUNOS configuration mode commands.
List of Technical Publications Table 3: Technical Documentation for Supported Routing Platforms (continued) Book Description JUNOS Configuration and Diagnostic Automation Guide Describes how to use the commit script and self-diagnosis features of the JUNOS software. This guide explains how to enforce custom configuration rules defined in scripts, how to use commit script macros to provide simplified aliases for frequently used configuration statements, and how to configure diagnostic event policies.
MX960 Ethernet Services Router DC Power Supply Installation Instructions Table 3: Technical Documentation for Supported Routing Platforms (continued) Book Description JUNOScope Software User Guide Describes the JUNOScope software graphical user interface (GUI), how to install and administer the software, and how to use the software to manage routing platform configuration files and monitor routing platform operations.
List of Technical Publications Table 3: Technical Documentation for Supported Routing Platforms (continued) Book Description JUNOS Enhanced Services Release Notes Summarize new features for a particular release, identify known hardware and software problems, provide information that might have been omitted from the manuals, and provide upgrade and downgrade instructions.
MX960 Ethernet Services Router DC Power Supply Installation Instructions Table 5: Additional Books Available Through http://www.juniper.