M7i Internet Router Quick Start 30 April 2007 Part Number: 530-017640-01 Revision 2 This document describes how to install the M7i Internet router. Contents Quick Start Description ...................................................................................3 Step 1: Prepare the Site ...................................................................................3 Rack-Mounting Requirements ...................................................................3 Tools Required .......................
M7i Internet Router Quick Start Compliance Statements for NEBS ..................................................................17 Compliance Statements for EMC Requirements ............................................17 Canada ...................................................................................................17 European Union ......................................................................................17 Declaration of Conformity ..................................................
Quick Start Description Quick Start Description This Quick Start contains information you need to install and configure the router quickly. For complete installation instructions, see the M7i Internet Router Hardware Guide at http://www.juniper.net/techpubs/hardware/. WARNING: This Quick Start contains a summary of safety warnings in “Safety Warnings” on page 15. For a complete list of warnings for this router, including translations, see the M7i Internet Router Hardware Guide at http://www.juniper.
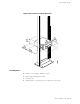
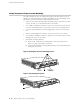
M7i Internet Router Quick Start floor-to-ceiling rack. If you do so, the rack must be capable of supporting a combined weight of over 766 lb (347 kg). 4 ■ ■ The rack rails must be spaced widely enough to accommodate the router chassis's external dimensions: 3.5 in. (8.9 cm) high, 18.2 in. (45.7 cm) deep, and 17.5 in. (44.5 cm) wide. The mounting hardware extends the width to fit into standard 19-in. racks.
Step 1: Prepare the Site Figure 1: Rack Clearances and Router Dimensions Tools Required ■ Phillips (+) screwdriver, numbers 1 and 2 ■ Electrostatic discharge wrist strap ■ Antistatic mat ■ Blank panels to cover any slots not occupied by a component Step 1: Prepare the Site ■ 5
M7i Internet Router Quick Start Step 2: Prepare for Front or Center Mounting The cable management system organizes and supports the PIC cables to prevent damage. The mounting brackets are shipped installed in the front-mounting position, but must be removed to install the cable management system. 1. Attach an electrostatic discharge (ESD) grounding strap to your bare wrist and connect the strap to one of the ESD points on the chassis. 2.
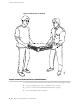
Step 3: Install the Router Step 3: Install the Router 1. Have one person grasp each side of the router, lift the router, and position it in the rack. See Figure 4 on page 8. 2. Align the bottom hole in each mounting bracket with a hole in each rack rail, making sure the chassis is level. 3. Install a mounting screw (provided in the accessory box shipped with the router) into each hole. Use a Phillips screwdriver to tighten the screws. 4. Install a screw into the second hole in each mounting bracket.
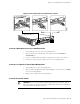
M7i Internet Router Quick Start Figure 4: Lift the Router into the Rack Step 4: Connect External Devices and PIC Cables To connect external devices and PIC or FIC cables, perform the following procedures: 8 ■ ■ Connect a Management Console or Auxiliary Device on page 9 ■ Connect to a Network for Out-of-Band Management on page 9 ■ Connect FIC and PIC Cables on page 9 Step 4: Connect External Devices and PIC Cables
Step 4: Connect External Devices and PIC Cables Figure 5: Connect External Devices and PIC Cables to Router Connect a Management Console or Auxiliary Device 1. Turn off the power to the console or auxiliary device. 2. Plug the female end of the RS-232 serial connector into the CONSOLE or AUX/MODEM port. 3. Use a 2.5 mm flat-blade screwdriver to tighten the screws on the connector. 4. Connect the other end of the cable to the console or auxiliary device.
M7i Internet Router Quick Start CAUTION: To prevent damage to fiber-optic transceivers and fiber-optic cables, observe the following precautions: ■ Do not leave a fiber-optic transceiver uncovered except when inserting or removing cable. The safety plug keeps the port clean and prevents accidental exposure to laser light. ■ Do not bend fiber-optic cable beyond the maximum bend radius. An arc smaller than a few inches in diameter can damage the cable and cause problems that are difficult to diagnose.
Step 5: Connect Ground and Power Cables 3. Verify that the switch on each power supply faceplate is in the OFF (O) position. 4. For each power supply: a. Insert the appliance coupler end of a power cord into the appliance inlet on a power supply faceplate. b. Insert the plug into an AC power source receptacle. c. Verify that the power cord does not block access to router components or drape where people could trip on it.
M7i Internet Router Quick Start 11. Verify that the power cables are not touching or blocking access to router components, and that they do not drape where people could trip on them. 12. Switch on the external circuit breakers to provide voltage to the DC power source cable leads. Figure 6: Connect the Power Cables to a DC Router Step 6: Power On the Router 12 ■ 1.
Step 7: Perform Initial Software Configuration 7. Verify that the OUPUT OK LED lights steadily. If the LED does not light after 60 seconds, repeat Steps 3 through 6. If necessary, reinstall the AC power cord or DC power cables. 8. For routers with two power supplies, repeat Steps 3 through 7 for the second power supply. Step 7: Perform Initial Software Configuration This procedure connects the router to the network but does not enable it to forward traffic.
M7i Internet Router Quick Start root@# set system name-server address 10. Set the root authentication password by entering either a clear-text password, an encrypted password, or an ssh public key string (DSA or RSA).
Safety Warnings 13. Optionally, configure additional properties by adding the necessary configuration statements. Then commit the changes to activate them on the router. [edit] root@host# commit 14. When you have finished configuring the router, exit configuration mode. [edit] root@host# exit root@host> Safety Warnings WARNING: See installation instructions before connecting the router. This is a summary of safety warnings.
M7i Internet Router Quick Start ■ When installing the router, do not use a ramp inclined at more than 10 degrees. ■ Manually installing the router requires two people to lift. To prevent injury, keep your back straight and lift with your legs, not your back. Do not attempt to lift the chassis by the power supply handles. ■ The router should be mounted at the bottom of the rack if it is the only unit in the rack.
Compliance Statements for NEBS Compliance Statements for NEBS This product complies with the following standards: ■ GR-63-Core: NEBS, Physical Protection ■ GR-1089-Core: EMC and Electrical Safety for Network Telecommunications Equipment ■ SR-3580 NEBS Criteria Levels (Level 3 Compliance) Compliance Statements for EMC Requirements Canada This Class A digital apparatus complies with Canadian ICES-003. Cet appareil numérique de la classe A est conforme à la norme NMB-003 du Canada.
M7i Internet Router Quick Start Declaration of Conformity 18 ■ Compliance Statements for EMC Requirements
List of Technical Publications List of Technical Publications Table 1 on page 19 lists the software and hardware guides and release notes for Juniper Networks J-series, M-series, MX-series, and T-series routing platforms and describes the contents of each document. Table 2 on page 22 lists the books included in the Network Operations Guide series.
M7i Internet Router Quick Start Table 1: Technical Documentation for Supported Routing Platforms (continued) Book Description Secure Configuration Guide for Common Criteria and JUNOS-FIPS Provides an overview of secure Common Criteria and JUNOS-FIPS protocols for the JUNOS Internet software and describes how to install and configure secure Common Criteria and JUNOS-FIPS on a routing platform.
List of Technical Publications Table 1: Technical Documentation for Supported Routing Platforms (continued) Book Description JUNOS API and Scripting Documentation JUNOScript API Guide Describes how to use the JUNOScript application programming interface (API) to monitor and configure Juniper Networks routing platforms. JUNOS XML API Configuration Reference Provides reference pages for the configuration tag elements in the JUNOS XML API.
M7i Internet Router Quick Start Table 1: Technical Documentation for Supported Routing Platforms (continued) Book Description Administration Guide Shows how to manage users and operations, monitor network performance, upgrade software, and diagnose common problems on J-series Services Routers.
Requesting Support Requesting Support For technical support, open a support case with the Case Manager link at http://www.juniper.net/support/ or call 1-888-314-JTAC (from the United States, Canada, or Mexico) or 1-408-745-9500 (from elsewhere). Revision History 30 April 2007—530-017640-01. Revision 2. Added NEBs requirements and other safety warnings. Corrected DC connect procedure. Added list of technical publications. 12 January 2007—530-017640-01. Revision 1.