
Network Router User Manual
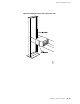


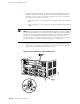


Figure 25: Attaching Cable to a PIC
Providing Power to the Router
Connect the router to external power sources and power it on by performing the
following procedures:
■ Connecting Power to an AC-Powered Router on page 62
■ Connecting Power to a DC-Powered Router on page 63
■ Powering On the Router on page 65
Connecting Power to an AC-Powered Router
Connect AC power to the router by plugging the power cord supplied with each power
supply into the appliance inlet on the power supply faceplate and into an AC power
source receptacle. Follow this procedure:
1. Locate the power cords shipped with the router, which should have a plug
appropriate for your geographical location (see “AC Power, Connection, and Power
Cord Specifications” on page 178).
2. Attach an electrostatic discharge (ESD) grounding strap to your bare wrist and
connect the strap to one of the ESD points on the chassis. Make sure the router
is attached to a proper earth ground. For more information about ESD, see
“Preventing Electrostatic Discharge Damage” on page 140.
3. Connect the grounding cable to a proper earth ground.
4. Verify that a licensed electrician has attached the cable lug provided with the
router to the grounding cable.
5. Using a number 2 Phillips screwdriver, remove the screws next to the grounding
symbol above the power supplies on the chassis rear. Secure the grounding cable
lug to the chosen grounding point by reinstalling and tightening the screws.
62 ■ Providing Power to the Router
M10i Internet Router Hardware Guide