
Network Router User Manual


■ Read the information in “Installation Safety Guidelines and Warnings” on page 153,
with particular attention to “Chassis Lifting Guidelines” on page 154.
■ Remove the router from the shipping carton, as described in “Unpacking the
Router” on page 47.
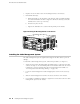
Then perform the following procedures to install the router (see Figure 20 and
Figure 21):
1. If you are center-mounting the router, move the mounting brackets on the chassis
from the front-mounting position to the center-mounting position. For
instructions, see “Moving the Mounting Brackets” on page 51.
2. Position the chassis at the appropriate height in the rack:
■ If using a mechanical lift, load the router onto the lift, making sure it rests
securely on the lift platform. Use the lift to raise the chassis to the correct
height.
■ If not using a mechanical lift, have one person stand behind the router and
another person in front. Grasp the chassis, lift it, and position it at the correct
height. Have a third person ready to install the mounting screws.
3. Align the bottom hole in both mounting brackets with a hole in each rack rail,
making sure the chassis is level.
4. Install a mounting screw into each of the two aligned holes. Use a Phillips
screwdriver to tighten the screws.
5. Moving up the router, install a mounting screw into the remaining holes in each
mounting . At least two screws in each mounting bracket are required, at the
top and bottom of the mounting bracket.
6. Verify that the router is level.
7. If using a mechanical lift, move it away from the rack.
8. To continue the installation, proceed to “Connecting the Router ” on page 59.
56 ■ Installing the Chassis in the Rack
M10i Internet Router Hardware Guide