
Network Router User Manual


6. Replace the screws that secure the mounting brackets to the chassis.
7. Reinstall the fan trays:
a. Grasp the handle on the faceplate of the fan tray with one hand and place
the other hand under the unit to support it. Orient the fan tray so that the
thumbscrew is at the top of the tray.
b. Slide the tray into the slot.
c. Tighten the thumbscrew to seat the fan tray firmly in the chassis.
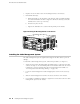
Figure 18: Moving the Mounting Brackets on the Chassis
Installing the Cable Management System
The cable management system organizes and supports the PIC cables to prevent
damage.
To install the cable management system, follow this procedure (see Figure 19):
1. Attach an electrostatic discharge (ESD) grounding strap to your bare wrist and
connect the strap to one of the ESD points on the chassis. Make sure the router
is attached to a proper earth ground. For more information about ESD, see
“Preventing Electrostatic Discharge Damage” on page 140.
2. Locate the cable management racks and appropriate screws in the accessory
box.
3. Slide the cable management rack into the slots at the front of the chassis.
4. Use a number 2 Phillips screwdriver to tighten the screws that secure the cable
management system to the chassis.
52 ■ Installing the Cable Management System
M10i Internet Router Hardware Guide