
Network Router User Manual


Chapter 7
Installing the Mounting Hardware
In a four-post rack or cabinet, you front-mount the router. In an open-frame rack,
you can center-mount or front-mount the router. In an open-frame rack,
center-mounting provides more even distribution of weight and greater stability. If
you are installing the router in a four-post rack or cabinet, or front-mounting it in an
open-frame rack, we recommend using a shelf to support the router.
■ Moving the Mounting Brackets on page 51
■ Installing the Cable Management System on page 52
Moving the Mounting Brackets
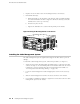
The router is shipped with the mounting brackets installed in the front-mounting
position, as shown in Figure 1. If you are center-mounting the router, you must move
the brackets. To move the mounting brackets, follow this procedure (see Figure 18):
1. Attach an electrostatic discharge (ESD) grounding strap to your bare wrist and
connect the strap to one of the ESD points on the chassis. Make sure the router
is attached to a proper earth ground. For more information about ESD, see
“Preventing Electrostatic Discharge Damage” on page 140.
2. To install the mounting brackets in the center-mounting position, you must
remove the fan trays:
a. Loosen the thumbscrew at the top of the fan tray faceplate, using a Phillips
screwdriver if necessary.
b. Grasp the handle on the faceplate and slide the tray about halfway out of
the chassis.
c. Place one hand under the fan tray to support it and slide the tray completely
out of the chassis.
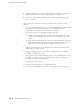
3. Use a number 2 Phillips screwdriver to remove the screws securing the mounting
brackets in the front-mounting position.
4. Remove the mounting brackets by tilting the top of the mounting bracket away
from the chassis and sliding it out of the slot at the bottom of the chassis.
5. Insert the tab at the base of the mounting brackets at an angle into the slot at
the bottom of the chassis in the center-mounting position (see Figure 18).
Moving the Mounting Brackets ■ 51