
Network Router User Manual
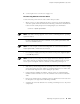


8. Place one hand under the Routing Engine to support it, slide it completely out
of the chassis, and place it on the antistatic mat or in the electrostatic bag.
Figure 45: Removing a Routing Engine
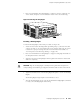
Installing a Routing Engine
To install a Routing Engine, follow this procedure (see Figure 46):
1. Attach an electrostatic discharge (ESD) grounding strap to your bare wrist and
connect the strap to one of the ESD points on the chassis. Make sure the router
is attached to a proper earth ground. For more information about ESD, see
“Preventing Electrostatic Discharge Damage” on page 140.
2. Place one hand under the Routing Engine to support it and grasp the handle on
the faceplate with the other hand.
3. Align the rear of the Routing Engine with the guide rails inside the chassis and
slide it in completely.
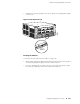
CAUTION: Align the Routing Engine carefully with the guide rails and push it in
evenly. Damage can result if it gets lodged in the rails because of uneven movement.
4. Tighten the thumbscrews on the Routing Engine faceplate to secure the Routing
Engine.
The Routing Engine might require several minutes to boot.
5.
After the Routing Engine boots, issue the show chassis routing-engine command
to verify correct Routing Engine functioning.
Replacing Routing Engine Components ■ 123
Chapter 13: Replacing Hardware Components