
Network Router User Manual


Removing a DC Power Supply
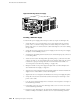
The DC power supplies are located at the bottom rear of the chassis, as shown in
Figure 2. For information about power supply redundancy and replaceability, see
“Power Supplies” on page 19.
CAUTION: Do not leave a power supply slot empty for more than a short time while
the router is operational. The power supply must remain in the chassis for proper
airflow.
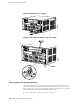
To remove a DC power supply, follow this procedure (see Figure 41):
1. Attach an electrostatic discharge (ESD) grounding strap to your bare wrist and
connect the strap to one of the ESD points on the chassis. Make sure the router
is attached to a proper earth ground. For more information about ESD, see
“Preventing Electrostatic Discharge Damage” on page 140.
2. Press the power switch for the power supply (located on the power supply
faceplate) to the OFF (O) position.
NOTE: If you are power cycling the power supply rather than shutting it off for a
time, wait at least 60 seconds after turning it off before turning it back on. If you
need to power it off again, wait for at least 60 seconds after powering it on.
3. Shut off the power flowing to the power supply from the external power source,
so that the voltage across the leads of the power cables is 0 V. Ensure that there
is no chance that the cable leads might become active during the procedure.
4. Using a number 1 Phillips screwdriver, turn the screw on each field-wiring
terminal counter-clockwise to loosen the terminal connector from around the
cable lug.
5. Remove the cables from the terminal connectors and from the hook located on
the faceplate to the right of the field-wiring terminals.
6. Loosen the thumbscrew at each end of the power supply faceplate, using a Phillips
screwdriver if necessary.
7. Grasp the handle on the power supply faceplate and pull firmly to slide the unit
about halfway out of the chassis.
8. Place one hand under the power supply to support it, then slide it completely
out of the chassis.
Replacing Power System Components ■ 113
Chapter 13: Replacing Hardware Components