
Network Router User Manual


NOTE: Wait until a message appears on the console confirming that the operating
system has halted.
For more information about the command, see the JUNOS System Basics and
Services Command Reference.
NOTE: The router might continue forwarding traffic for a few minutes after the
request system halt command has been issued.
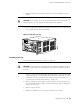
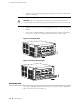
5. Attach an electrostatic discharge (ESD) grounding strap to your bare wrist and
connect the strap to one of the ESD points on the chassis. Make sure the router
is attached to a proper earth ground. For more information about ESD, see
“Preventing Electrostatic Discharge Damage” on page 140.
6. Loosen the thumbscrews located at each end of the Routing Engine faceplate,
using a Phillips screwdriver if necessary.
7. Grasp the handle and slide the unit about halfway out of the chassis.
CAUTION: Slide the Routing Engine straight out of the chassis. Damage can result if
it gets lodged because of uneven movement.
8. Place one hand under the Routing Engine to support it, slide it completely out
of the chassis, and place it on the antistatic mat or in the electrostatic bag.
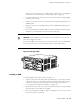
9. Grasp the handle of the HCM and slide the unit about halfway out of the chassis.
CAUTION: Slide the HCM straight out of the chassis. Damage can result if it gets
lodged because of uneven movement.
10. Place one hand under the HCM to support it, slide it completely out of the chassis,
and place it on the antistatic mat or in the electrostatic bag.
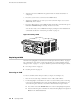
94 ■ Replacing an HCM
M10i Internet Router Hardware Guide