
Network Router User Manual

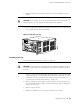


4. Align the rear of the CFEB with the guides inside the chassis and slide it in
completely.
5. Press the ejector lever at each end of the CFEB inward.
6. Tighten the thumbscrew on each ejector lever (shown in Figure 4) to seat the
CFEB firmly in the chassis.
7. Press the offline button on the CFEB faceplate and hold it down until the green
LED labeled OUTPUT OK lights steadily, in about 5 seconds.
You can also verify correct CFEB functioning by issuing the show chassis cfeb
commands described in “Maintaining the CFEB” on page 73.
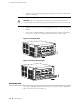
Figure 30: Installing a CFEB
Replacing an HCM
The HCM is hot-pluggable, as described in “Field-Replaceable Units (FRUs)” on page 3.
For a description of the effect of removing an HCM, see “High-Availability Chassis
Manager (HCM)” on page 17. To replace an HCM, perform the following procedures:
■ Removing an HCM on page 92
■ Installing an HCM on page 95
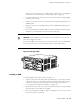
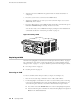
Removing an HCM
To remove an HCM, follow this procedure (see Figure 31 and Figure 32):
1. Place an electrostatic bag or antistatic mat on a flat, stable surface.
2. If a Routing Engine is installed in the same row as the HCM you are removing,
remove the Routing Engine first. If two Routing Engines are installed, use one
of the following two methods to determine which is functioning as master:
■
Note which of the blue MASTER LEDs is lit on the Routing Engine faceplates.
■ Issue the following CLI command. The master Routing Engine is designated
Master in the Current state field:
92 ■ Replacing an HCM
M10i Internet Router Hardware Guide