
Services Routers Hardware Guide
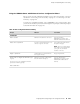
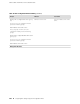
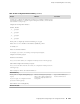
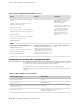
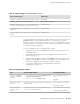
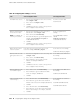
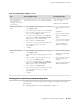
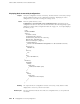


Table 45: Configuring Basic Settings (continued)
CLI Configuration EditorJ-Web Configuration EditorTask
Set remote access for SSH:
set services ssh
1.
In the Nested configuration section, next to Services,
click Configure or Edit.
2.
Next to Ssh, click Configure or Edit.
3.
Click OK.
4.
Click OK a second time to return to the System level
in the configuration editor hierarchy.
Allow SSH remote access.
Set the root password. For
example:
set root-authentication ssh-rsa
“ssh-rsa
AAAAB3Nza...D9Y2gXF9ac==
root@routera.lab.router.net”
1.
In the Nested configuration section, next to Root
authentication, click Configure or Edit.
2.
Next to Ssh rsa, click Add New Entry.
3.
In the Authorized key box, type the RSA password—for
example, ssh-rsa AAAAB3Nza...D9Y2gXF9ac==
root@routera.lab.router.net
4.
Click OK.
5.
Click OK a second time to return to the System level
in the configuration editor hierarchy.
Define root authentication
for access to the router.
NOTE: For readability, the
entire key is not shown.
Set the time zone. For example:
set time-zone America/Los_Angeles
In the Time zone list, select the time zone for your
router—for example, America/Los_Angeles.
Define the time zone the
router is located in.
Set the address of the NTP server.
For example:
set ntp server 10.148.2.21
1.
In the Nested configuration section, next to Ntp, click
Configure or Edit.
2.
Next to Server, click Add New Entry.
3.
In the Address box, type the NTP server's IP
address—for example, 10.148.2.21
4.
Click OK.
5.
Click OK a second time to return to the System level
in the configuration editor hierarchy.
Define the NTP server that
NTP requests can be sent
to.
Set the address of the DNS server.
For example:
set name-server 10.148.2.32
1.
Next to Name server, click Add New Entry.
2.
In the Address box, type the address of the DNS
server—for example, 10.148.2.32.
3.
Click OK.
Define the DNS server that
receives DNS requests.
Set the domains to be searched.
For example:
set domain-search lab.router.net
set domain-search router.net
1.
Next to Domain search, click Add New Entry.
2.
In the Value box, type the name of the domain in
which the router is located—for example, lab.router.net.
3.
Click OK.
4.
Next to Domain search, click Add New Entry.
5.
In the Value box, type the name of another domain
that the router belongs to—for example, router.net.
6.
Click OK.
Add each domain that the
router belongs to.
112 ■ Configuring Basic Settings with a Configuration Editor
JUNOS Software with Enhanced Services Hardware Guide