
Services Routers Hardware Guide

To connect to the CLI using a local management device through the console port on
the router:
1. Turn off power to the router.
2. Turn off the power to the management device, such as a PC or laptop computer,
that you are using to access the CLI.
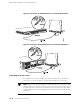
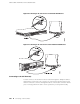
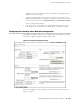
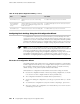
3. Plug one end of the Ethernet cable supplied with your router into the RJ-45 to
DB-9 serial port adapter supplied with your router (see Figure 57 on page 100).
4. Plug the RJ-45 to DB-9 serial port adapter into the serial port on the management
device (see Figure 57 on page 100).
5. Connect the other end of the Ethernet cable to the console port on the router
(Figure 57 on page 100).
6. Turn on the power to the management device.
7. Start your asynchronous terminal emulation application (such as Microsoft
Windows Hyperterminal) and select the appropriate COM port to use (for example,
COM1).
8. Configure the port settings as follows:
■ Bits per second: 9600
■ Data bits: 8
■ Parity: None
■ Stop bits: 1
■ Flow control: None
9. Power on the router by pressing the power button on the front panel. Verify that
the POWER LED on the front panel turns green.
The terminal emulation screen on your management device displays the boot
sequence. When the router has finished booting, a login prompt appears.
10.
Log in as the user root. No password is required at initial connection, but you
must assign a root password before committing any configuration settings.
Connecting to a Services Router ■ 99
Chapter 6: Establishing Basic Connectivity