
Services Routers Hardware Guide


■ Install the Services Router in its permanent location, as described in “Installing
and Connecting a Services Router” on page 77.
■ Gather the following information:
■ Hostname for the router on the network
■ Domain that the router belongs to on the network
■ Password for the root user
■ Time zone where the router is located
■ IP address of an NTP server (if NTP is used to set the time on the router)
■ IP address of a DNS server
■ List of domains that can be appended to hostnames for DNS resolution
■ IP address of the default gateway
■ IP address to be used for the loopback interface
■ IP address of the built-in Ethernet interface that you will use for management
purposes. The examples in this guide use the ge-0/0/0 interface.
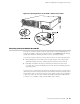
■ If you are performing the initial configuration with the J-Web interface, collect
the following equipment:
■ A management device, such as a laptop, with an Ethernet port
■ An Ethernet cable (provided)
■ If you are performing the initial configuration with the CLI, collect the following
equipment:
■ A management device, such as a PC or laptop, with a serial port and an
asynchronous terminal application (such as Microsoft Windows
Hyperterminal)
■ An RJ-45 to DB-9 serial port adapter (provided)
■ An Ethernet cable (provided)
■ For a remote connection, two dial-up modems
■ For a remote modem connection, a DB-9 female to DB-25 male adapter, or
other adapter appropriate for your modem (not provided)
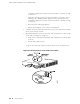
Connecting to a Services Router
You can connect to the Services Router using the J-Web or CLI interface. You can
connect to the CLI from a remote location through two dial-up modems. For details
see, “Connecting to the CLI Remotely” on page 100.
96 ■ Connecting to a Services Router
JUNOS Software with Enhanced Services Hardware Guide