
Services Routers Hardware Guide
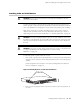
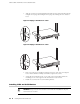
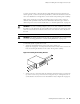
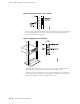
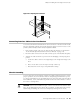
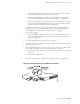
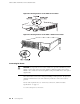

Figure 46: Attaching the Center Screw to the Rack
3. Lift the router and insert the larger elliptical openings in the mounting brackets
onto the partially inserted screws so that the router is hanging from the two
screws (see Figure 47 on page 82).
Figure 47: Hanging the Router in the Rack
4. Verify that the mounting screws on one side of the rack are aligned with the
mounting screws on the opposite side and that the router is level.
5. Install at least two mounting screws into each mounting bracket, in addition to
the center screws from which the router hangs (see Figure 48 on page 83). Use
a number 2 Phillips screwdriver to tighten the screws.
82 ■ Installing J4350 and J6350 Routers
JUNOS Software with Enhanced Services Hardware Guide