
User Manual

Deviation User Manual for Jumper T8SG, Release 5.0
6 Chapter 2. Installation
2.3. Upgrading the file system via USB
Open the folder that has been extracted from the zip file and copy all the files and directories inside this
folder to the root of the transmitter USB drive. For details of the file-system please see USB & File-system.
The files with the extension ‘zip’, and ‘dfu’ need not to be copied.
If you are upgrading from an older release, don’t upgrade the ‘tx.ini’, and ‘hardware.ini’ files or the ‘models’
directory. Optionally, copy the ‘models’ directory to the transmitter except for the currently configured
model files. This last step will ensure that the defaults for newly created models have the latest options
set. If the ‘tx.ini’ file is overwritten, the stick calibration must be repeated and any settings reset.
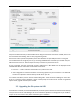
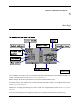
2.4 DFU Installation with Deviation Uploader
The ‘Deviation Uploader’ is a Java (jar) file. You can either pass the jar file to the Java executable on the
command line, or open the file in the GUI, using the Java application to open it. You will need to install
Java from http://www.java.com/ if you haven’t already installed it.
Once the ‘Deviation Uploader’ is open, connect your transmitter to a USB port, and then turn it on while
holding down the ‘EXT’ button.
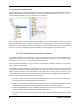
If everything is working properly, you should see the ‘Transmitter’ change to the type of the connected
transmitter. If it changes to the wrong transmitter type, stop now and seek help from the forums. If it
doesn’t change, check the system information to see if the device is listed at all. If it shows up as an
unknown device on Windows, then check your driver installation and try unplugging all other USB devices.
Take the steps necessary to resolve any connection issues.
1. Press the ‘...’ button and select the zip file for the firmware you will install. There is no need to unpack
the zip file since the Deviation Uploader will handle that.
2. If this is an initial install, all the ‘Replace’ boxes, along with ‘Format’ will be preselected. On the Devo
F7 and Devo F12E initial install, select the ‘Format’ check box if not already selected.
3. Click the ‘Install/Upgrade’ option. Installation will take a few minutes, so be patient. A pop-up dialog
box will notify you when installation is completed. You are done.
4. Turn off your Devo transmitter. When you turn it on again, you’ll be greeted by the Deviation splash
screen.