PLC-2760NV INSTRUCTION MANUAL
CONTENTS 1. Specifications ................................................................................................................. 1 2. Threading the machine head ......................................................................................... 2 3. Pneumatic components (when the pneumatic center guide is used) ....................... 3 4. Setting the incidental device (pneumatic center guide) ............................................ 5 4-1.
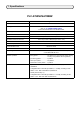
1. Specifications PLC-2760NVSA70BBZ Item Application Model Sewing speed PLC-2760NV Max. 2,500 sti/min Refer to "10. SEWING SPEED TABLE" in the Instruction Manual for the standard model. Stitch length Needle Max.
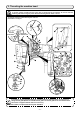
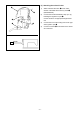
2. Threading the machine head WARNING : To protect against possible personal injury due to abrupt start of the machine, be sure to start the following work after turning the power off and ascertaining that the motor is at rest. Thread the machine head following the order as illustrated in the figure.
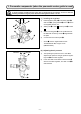
3. Pneumatic components (when the pneumatic center guide is used) WARNING : To protect against possible personal injury due to abrupt start of the machine, be sure to start the following work after turning the power off and ascertaining that the motor is at rest. (1) Installing the regulator ❽ ❺ ❷ ❸ 2 ❻ 1) Install regulator (asm.) ❶ on mounting plate ❺ with screw ❷ , spring washer ❸ and nut ❹ which are supplied with the unit. 2) Attach joint ❻ to inlet 1 . Attach joint ❼ to outlet 2 .
(3) Attaching the solenoid valve ❺ 1) ❶ 2) ❹ ❸ ❷ 3) 4) 2 ø4 tube –4– Attach solenoid valve asm. ❷ to the undersurface of the table with accessory screw ❶ (SK3452001SE). Connect the ø6 tube described in step 4) in "(1) Installing the regulator" to joint ❸ . Cut the ø6 tube to an appropriate length before use. Connect the ø4 air tube coming from the air type center guide to joint ❹ . Connect connector ❺ to the CN59 on the electrical control box.
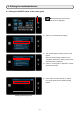
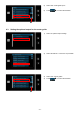
4. Setting the incidental device 4-1. Setting the ON/OFF status of the center guide ❶ 1) ❶ held pressed for three second. The "mode screen" is displayed. 2) Select "14. Incidental device setting". 3) The "Incidental device setting screen" is displayed. When the device setting of which is to be changed is selected, the setting screen for the selected device is displayed. Select "1. Center guide" to display the "Center guide setting screen".
6) Select ON/OFF status of the function. 7) Press ❷ to confirm the setting. 8) Press ❸ to display the sewing data ❷
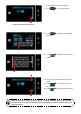
edit screen. ❸ 9) ❹ to display the "S056 center Press guide". ❹ ❻ 10) Then, set the ON/OFF status of the center guide. ❺ to confirm the value you 11) Press have entered. 12) Press ❻ to display the sewing screen.4-2. Setting the optional input for the the center guide Assign the switching function of the center guide to the 6-gang switch. ❶ 1) ❶ held pressed for three second. The "mode screen" is displayed. –7– 2) Select "19. Optional I/O setting". 3) Select "1. Optional input setting". 4) Select "INPUT6. Thread clamp switch input".
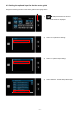
5) Select "i62. Center guide input". 6) Press ❷ to confirm the selection. ❷ 4-3. Setting the optional output for the center guide ❶ –8– 1) Select "2. Optional output setting". 2) Select "OUTPUT11. Function is not provided". 3) Select "o25. Center guide". 4) Press ❶ to confirm the selection.