
User manual
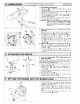
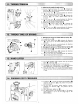

1.
Adjusting
the
pressure
required to
depress the
front
part
of the
pedal
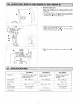
1) This
pressure
can be changed
by altering the
mounting
position
ofpedaling
pressure
adjust spring
O
.
2)
The
pressure
decreases
when
you
hook the spring on
the
left side.
3) The
pressure
increases
when
you
hook the spring on
the
risht side.
Adjusting the
pressure
required to
depress
the
back
part
of
the
Pedal
This
pressure
can
be adjusted using regulator
screw
O
The
pressure
increases as
you
turn the
regulator
screw in.
The
pressure
decreases as
you
turn the
screw
out,
Adjusting the
pedal
stroke
The
pedal
stroke decreases
when
you
insert connecting
rod
O
into the left hole.
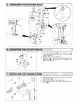
2.
l)
2)
3)
3.
1)
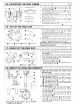
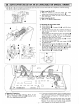
1. Installing
the connecting rod
1) Move
pedal
O
to
the right
or
left as illustrated by
the arrows so that motor control lever
O
and
connecting
rod
€)
are straightened.
2. Adjusting the
pedal
angle
l) The
pedal
tilt can be freely adjusted by changing
the
length
of the connecting rod.
2) Loosen adjust screw
@
,
and adjust the
length of
connecting rod
O
.
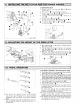
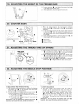
REVERSE FEED
STITCHING
MECHANISM
1.
How
to operate
1) The moment switch iever
(O
is
pressed,
the machine
performs
reverse feed
stitching,
2) The machine
performs
reverse feed stitching as
long
as
the switch lever is held depressed.
3)
The machine resumes
normal feed stitching the moment
the switch lever is
released.
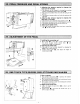
2. Height
of the
switch lever
1) Adjust the
height of switch
lever
O
so
that it can be
easilv ooerated.
2)
Loosen'screw
O
,
and
move the switch lever up or
down to adjust its
height.
-8--