- No.OO 19510304 Congratulations on your purchase of a JUKI sewingmachine. Pleaseread this Instruction Manualcarefully before using the unit in order to get the most out of it and to enjoy usingit for a long time. IO'N, " i'. BEFo.:n'f.'.O,FE:F. O PE R AT I O NPR E C AU T I O N S 1. Neveroperatethe machineunlessits oil pan has been filled with oil. 2. After settingup the machine,check the direction of motor rotation.
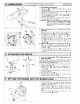
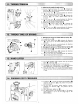
1. Informationon lubrication l) Fill oil pan O with JUKI New Defrix Oil No. I up to HIGH mark @ 2) When the oil level lowers below LOW mark @ , refill the oil pan with the soecifiedoil. 3) When you operate the machine after lubrication, you will see splashingoil through oil sight window @ if the lubricationis adeouate. 4) Note that the amount of the splashingoil is unrelated to the amountof the lubricatinsoil.
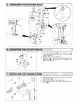
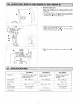
s. THREADIN:Gl:ll.rfpg,l'MAC]H,l'xe, n,EAb \-o i--.'-''-.- II ,,\. I )l 1 ) Turn stitch length dial O in the direction of the arrow, and align the desirednumber to marker dot @ on the machinearm. 2) The dial calibrationis in millimeters. 3 ) Whenyou want to decreasethe stitch length, turn stitch length dial O while pressingfeed lever @ in the direction of the arrow. l ) Assemblethe thread stand unit, and insert it in the hole in the machinetable. 2) Tightenlocknut O to fix the threadstand.
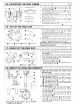
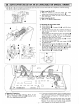
8. INSTALLINGTHE BELTCOVERAND THE BOBBIN 1. InstallingProcedure holes 6 1) Drill two woodenscre',r'suide 2) 3) 4) 5) 6) D and @ in the m a c h i n et a b l e . I n s e r ts u p p o r r O i n t h e t a p p e dh o l ei n t h e a r m . Fix belt cover collars O and @ usingthe belt cover setscre$,s @ for preliminaryinstallation. Accuratell position belt cover B O , then fix it on collar @ F i r b e l tc o v e rA @ o n c o l l a r @ S e c u r e l tr l.
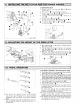
1. Adjusting the needle thread tension 1) ' As you turn threadtensionNo. I nut O clockwise(in direction @ ). the thread remainingon the needleafter threadtrimmingwill be shorter. (in direction 2) As you turn nut O counterclockwise @ 1 . t h e t h r e a dl e n g t hw i l l b e l o n g e r . 3)' As vou turn threadtensionNo. I nut O clockwise(in direction O ). the needle thread tension rvill be increased. 4) As you turn nut O counterclockwise(in direction O ), the needlethreadtensionwill be decreased. 2.
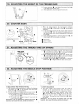
l S. ADJUSTING THE FEEDTI'MIIHG ( S t a n d a r df e e d t i m i n g ) | | Needle :zzrww\oNzzzz 16s631 ' plate Feeddog To obtain the standardfeed timing. alignsetscrew @ on feed eccentriccam O with setscrew @ on main shaft thrust collar @ ? ) To make adjustment, loosentrvo setscrews@ to release the feed eccentriccam, properll,'positionthe eccentric cam. Then retishtenthe setscrews. To advancethe feed timins in order to Dreventuneven material feed, move the Jeed e.cetrtric cam in the directionof the arrow.
1 9 . A DJ US TI N GT H E H E I G H TO F T H E P RE SS ERB AR LoosensetscrewQ , and adjust the presserbar height or the angfeof the presserfoot. 2) After adjustment,securelytighten the setscrew. l) I 2 0 . C O U NT E RK N I FE T- 1. When the knife sharpnesshas deteriorated. resharpen counterknife O as iflustratedin Fig. @ . and properly reinstallit.
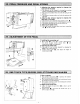
1. Adjusting the pressurerequiredto depressthe front part of the pedal 1) This pressurecan be changedby alteringthe mounting position ofpedaling pressureadjustspring O . when you hook the springon the 2) The pressuredecreases left side. 3) The pressureincreaseswhen you hook the springon the risht side. 2. Adjusting the pressurerequiredto depressthe backpart of the Pedal l ) This pressurecan be adjustedusingregulatorscrew O 2) The pressureincreasesasyou turn the regulatorscrewin.
1. Positioning the wiper Adjust the position of the wiper according to the thicknessof the materialsewn. The adjustmentprocedure is asfollows: 1) Turn the handwheelin the normal direction of rotation to align white marker dot l) on the handwheelwith red marker dot O on the machinearm. 2) Adjust the distancebetween the flat part of the wiper and the centerof the needleto 1 mm. Tighten wiper adjust screw 0 so that the wiper is pressedand fixed by wiper collar @ ( l I n--..'.----------..a\ 3) When the wip
(AK-3OOR AK-311(AVATLABLE ON SPECTALORDERI 28. AUTO-LTFTER * The AK-30 or AK-31 is designedto automaticallyraisethe presserfoot for 60 secondsafter completionof thread trimming. The AK-30 or AK-31 usesan exclusivemotor. 1. Howto usethe AK-30 1) Whenit is necessaryto raise the presser foot while sewing,stop sewingand depresskneeswitch O 2) The moment you releasethe knee switch. thepresser foot comesdown. 2. Howto usethe AK-31 1) Refer to "10.PEDALOPERATION" 3.
S WI T C H ESI N T H E P SC BO X : lgE E r - - - . rE =,6;. f \ trtrE f-1.' t----'' ' j'BI s sw3 ,/ FDISA l^r E D IS B REVOT SAST€ T ESTA ilt r-) r-\ r, TP5 TP6 s 6tD T€ST8 TESTP sNUU-0 t248 tl o"X 9 rl \*l l-\}1.l IPl I ss! +tav , sw2, Lh bEl I. , BrsuBFD^l Jrax I El,l lro | - l I REV n Mzloot30| RIKP-4sv-o ON/OFF of the selectorswitches [_-_l l;lu| t-l | <- Switch OFF + Switch ON | I-TI I ]rol l-- t= ll I 1.
rJl.lKl JUKICORPORATION HEADOFFICE 2 - 1 .8 - C H O N / EK,O K U R Y O . C H O TOKYO,JAPAN CHOFU-CITY, EUSINESS OFFICE 2 3 3 K A B U K I - C H] O -CHOME SHINJUKU-KU TO . K Y O1 6 0 .