
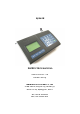
User's Manual

the wa ll.
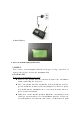
z Pla c e the tra nsmitte r o nto the wa ll (witho ut the p la stic b ra c ke t)
Plug the 2-a mp wa ll tra nsfo rme r into a ny suita b le AC o utle t.
Plug the p o we r c o nne c to r into the p o we r ja c k o n the to p le ft
ha nd sid e o f the unit. Tra nsmitte r is no w re a d y fo r use . Be c e rta in
to mo unt the tra nsmitte r a wa y fro m p ho ne s, he a t, mo isture a nd
e xp o se d p o we r c irc uits. The se ite ms c a n d a ma g e yo ur syste m
a nd sho rte n tra nsmissio n ra ng e .
3) SYSTEM C O NFIG URATIO N
Yo ur syste m wa s se t a t the fa c to ry a nd will func tio n a s so o n a s it is
p o we re d up .
Default setup is as below:
Current time
Sle e p shutd o wn - O FF
Ra ng e Te st - O FF
Default Alert Type - Vibe only
Duty Alert - OFF
O ut o f Ra ng e – O FF
Ba ud Ra te – 1200 BPS
Tra nsmissio n Fre q ue nc y - 11 kind s se le c ta b le
Re c e p tio n Fre q ue nc y - 457.5750 MHz fixe d
3. Syste m Pro g ra m ming (Tra nsm itte r Ve rsio n 1.01A)
To e nte r p ro g ra mming mo d e , p re ss the “ SETUP” b utto n a nd e nte r the
p a sswo rd “ 2580” fo llo we d b y “ ENTER” If the p a sswo rd is a c c e p te d , the
d isp la y will sho w “ use * to sc ro ll to me nu o p tio ns”
1) Se t C urre nt Time
z At the “ Se t C urre nt Time ” me nu, se t the ho ur the n p re ss “ ENTER”
ke y.
z Se t the minute s a nd p re ss “ ENTER” ke y.
z Use the “ # ” ke y to se le c t AM o r PM
z Afte r the time is se t, p re ss the “ ENTER” , a nd “ Time Sa ve d ” will