
Operation Manual


● ● ● ● ● ● ● ● ● ● ● ● ● ● ● ● ● ● ● ● ● ● ● ● ● ● ● ● ● ● ● ● ● ● ● ● ● ● ●
4-5
4
180
90
270
0
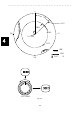
VRM1
EBL1
EBL2
VRM2
340.0°
nm
3.0nm
90.0°
VRM2
VRM2 Marker
EBL2
90DEG
Starting Point of EBL2
Cape
A
B
3NM
Own Ship
EBL1
340
EBL2
VRM2
EBL Control
Fig. 4.3
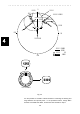
It is also possible to use EBL1 instead of EBL2 in measuring the bearing and
range between two optional points. In the procedures above, change EBL2
into EBL1 and VRM2 into VRM1, and left-click C of the EBL2 in step 2.