
Operation Manual


● ● ● ● ● ● ● ● ● ● ● ● ● ● ● ● ● ● ● ● ● ● ● ● ● ● ● ● ● ● ● ● ● ● ● ● ● ● ●
2-3
2
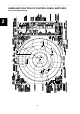
① [POWER] (Power Supply) Switch
This switch is used to turn the power on and off. The lamp lights when this switch is on.
When the power is on and it cannot be turned off for some reason, depressing this switch for five
seconds will force the power off.
② [PWR ACK] (Power Alarm Acknowledgment) Switch
When this switch is set to ON, the lamp lights to start the system.
In order for this key to work, an external battery is required (normally a power supply separate
from the AC unit).
③ [TX/STBY] (Operation) Switch
The「STANDBY」 will appear at the upper left of the radar display about 3 minutes after
the [PWR] switch is set to ON. Then, press this switch, and transmission will be started.
Pressing the switch during transmission sets the equipment to the standby state.
④ [ALARM ACK] (Alarm Acknowledgment) Switch
Press this switch to acknowledge a failure, approach of a target, or collision alarm.
⑤ [TUNE] (Turning) Control
Tunes the target signals to display the targets most clearly on the radar display.
Switching between AUTO and MANUAL can be done by pressing the knob.
⑥ [RAIN] (Rain/Snow Clutter Suppression) Control
Reduces the clutter echo caused by rain and snow.
Be careful not to set this adjustment too high. Setting this adjustment too high may cause the
target to be erased. Switching between AUTO and MANUAL can be done by pressing the knob.
⑦ [SEA] (Sea Clutter Suppression) Control
Reduces the clutter echo caused by the surface of the sea.
Be careful not to set this adjustment too high. Setting this adjustment too high may cause the
target to be erased. Switching between AUTO and MANUAL can be done by pressing the knob.
⑧ [GAIN] (Receiving Sensitivity) Control
Controls the radar receiving sensitivity.
Adjust the GAIN to a point where the background static does not interfere with operation.
⑨ [RANGE +/-] (Range Scale Select) Switch
Selects a range scale from 0.125 to 96 (or 120) nautical miles.
⑩ [EBL1] (Electric Bearing Line 1) Switch
Selects and displays EBL1. Switches between ON and OFF, and the function for which this
switch if valid. When depressed for two seconds or longer, this switch selects ON/OFF for the
floating setting.
⑪ [EBL2] (Electric Bearing Line 2) Switch
Selects and displays EBL2. Switches between ON and OFF, and the function for which this
switch if valid. When depressed for two seconds or longer, this switch selects ON/OFF for the
floating setting.
⑫ [EBL] (Electric Bearing Line) Control
Rotates the bearing of the EBL that is selected by EBL1 and 2.
⑬ [VRM1] (Variable Range Marker 1) Switch