
Users Manual
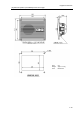
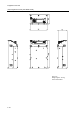


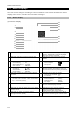

Names and Functions
2-3
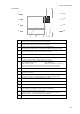
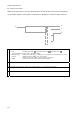
(2) Buttons
1
While there is any alarm, this button becomes the yellow “!” mark. Then if
touching here, the alarm information is appeared.
2
Switches transmitting power between 25 W and 1 W. The showing value is
changed each other, and is the current condition.
3
Sets the CH16 (priority channel) to the radiotelephone.
While displaying OPE button, touching here obtains the access rights.
4
Displays the menus screens. And also indicates the condition that the
system is operating by the rotating freeze indicator.
5
Displays the numeric key pad (input 0 to 9) for selecting channels.
6
Switches the S meter display on/off. The range of the level is as follows.
SIG: -20~+50 (dBuV), SQL: 0~15, VOL: 0~15
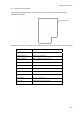
7
Indicates the DSC auto acknowledgement conditions.
• POS: Position request call • POL: Polling call
• TST: Safety test call • COM: Communication request call
During communicating events, this button becomes [CALL LIST] button to
display the
communication selection screen. (See the next page in detail.)
8
Displays a menu for editing the distress messages.
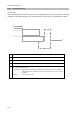
9
Displays the numeric key pad (input 0 to 9) for setting channels.
(Ten-key icon button)
10
Displays the menu for sending DSC calls. Furthermore, on the status
display, this button is a shortcut button for routine individual calls.
11
Displays the menu for sending distress relay calls.
12
Displays the function button keypad for various functions.
13
Increases the dimmer level in 15 steps.
14
Turns speaker on or off.
(During using the equalizer function, “EQ” is displayed.)
15
User key (Programmable favorite button)
Register a desired and assignable menu (e.g. frequently using) or a
special function. (Factory default setting: SCAN)
16
Decreases the dimmer level in 15 steps.
1
2
3
4
7
9
11 12
8
13
14
15
16
5
6
10