
User Manual
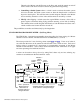
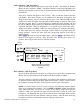

[PROG. Mix3]
ENT
THRO
STK
INH
LIST
CLR
0
…
FM0 FM1 FM2 AIL GER RUD MIX
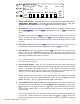
POS1
POS0
Pos0 0% Pos1 0%
-3%
Offset -140
#THR ELEV
1. Program Mix Number. Highlight and select one of the Standard Programmable Mixers
(PROG.MIX3 - PROG.MIX6) to obtain the first Programmable Mix display. Then press
ACT next to CLR or highlight and select INH to obtain the main mix display.
2. Select Master. All Programmable Mixers default to Throttle as both the Master and the
Slave (THROÆTHRO). The first THRO is the Master and the 2
nd
THRO represents the
Slave.
Highlight and select the first THRO to the left of the arrow to obtain a list of channels
that can be used as the Master. Highlight the #THR channel as the Master, bypassing any
throttle curve settings. This will cause the physical position of the throttle stick to control
the mixer.
3. Select Slave. Highlight and select THRO to the right of the arrow to obtain a list of
channels that can be used as the Slave. Highlight and select ELEV as the Slave.
4. Select Switch. Scroll down, highlight, and select GER as the switch to be used to turn the
mixer on and off. The GER indicator should now be in the upper or Pos1 position at the
bottom of the display. Any of the switches along the bottom of the display can be used
and multiple switches can be used if so desired.
Note: If multiple switches are selected, any switch in the Pos1 position has priority over
switches in the Pos0 position.
5. Select Switch Position. Move the Gear switch back and forth while observing the
number directly to the right of the Program Mix Name in the upper left hand corner of the
display. The number will change from 0 to 1 as the switch is moved back and forth.
When the number is 0, the mixer is looking at the Pos0 values (not programmed yet) and
when it is a 1 it is looking at the Pos1 values (also not programmed yet).
Put the switch in the position that is to turn the mixer ON (your choice). Look at the
number directly to the right of the Program Mix Name. If it is 0, highlight and select
Pos0 on the display. If it is 1, highlight and select Pos1 on the display.
6. Travel and Direction. With the switch still in the ON position, move the throttle stick to
the full low position and the lower value next to Pos should be highlighted. Set the lower
Pos parameter to a low negative value like -3%. This is the amount of deflection of the
elevator (Slave channel) that is to occur when the mixer is turned on and the throttle is
reduced to idle.
The elevator should barely move downward when the mixer is turned On and the throttle
is set to idle. If the elevator moves upward, change the –3% to a +3% to reverse the
direction that the elevator travels. The elevator can be made to move more by increasing
JR XP9303 Detailed Function Descriptions 79