
User Manual


REV.SW - SERVO REVERSING
Once all servos have been plugged into their proper channels in the receiver, the first thing to
check is the direction of travel of each servo. Move all sticks and switches/levers while
observing each servo to determine if the servos are moving in the correct directions. Make note
of those servos that are not traveling in the correct direction and use the REV.SW function to
reverse the direction of travel for these servos.
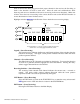
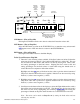
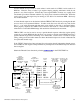
Highlight and select REV.SW in the Function List to obtain the servo reversing display.
[REV.SW]
Function
Name
ENT
LIST
CLR
THR AIL ELE RUD GER FLP AX2 AX3 AX4
Channels
Legend
REV.
NORM
Reversing Switches. To reverse a channel, highlight and select the
channel name. The setting toggles between Rev & Norm
Legend – (Servo Reversing)
The legend serves to illustrate the Reverse and Normal positions of the switches along the
bottom of the display. The upper switch position indicates Reversed while the lower
position represents Normal.
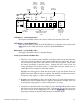
Channels – (Servo Reversing)
The abbreviations for all 9 channels are included on the display. To reverse the direction
of travel for a particular channel, highlight and select the channel. Pressing the rotary
selector toggles between Reverse and Normal.
Reversing Switches – (Servo Reversing)
The reversing switch beneath each channel indicates the current state – reversed or
normal. The upper switch position indicates Reversed while the lower position
represents Normal – the same as represented by the legend.
LIST Button – (Servo Reversing)
Press the LIST button to return to the FUNCTION List, or rotate the rotary selector until
LST appears next to LIST and select it to return to the SYSTEM Menu.
ENT Button – (Servo Reversing)
Pressing the ENT button returns to the Main Display.
JR XP9303 Detailed Function Descriptions 41