RE pe Joy sway er la mast le lair gg INSTRUCTION MANUAL THESE INSTRUCTIONS SHOULD BE READ BY A SUPERVISING ADULT 2.4GHz RTR BINARY MICRO R/C CATAMARAN SAILBOAT Mode! No:8807 IMPORTANT: 1. This is not a toy. Assembly and operating of this boat requires adult supervision. 2. Please take dime to read the instructions carefully and completely before attempting fo operate your model. This manual contains the instructions you dean fo safely build, operate and maintain your R/C sailboat.
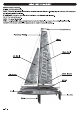
BASIC BOAT TERMINOLOGY BOW: The front of the boat. STERN: The back of the boat. PORT: This is the left side of the boat when view the boat from the stem. An easy way to remember this is that port and left both contain four letters. STARBOARD: This is the right side of the boat when view the boat from the stern. HULL: The body of the boat. DECK: The top of the boat. KEEL: A weighted blade that protrudes from the bottom of the hull as a means of providing lateral stability.
Install two control sticks before installing 4 pcs “AA” batteries. Always use fresh AA alkaline battery in the transmitter. 1. Ensure transmitter “POWER” switch is in the off position. 2. Slide off the battery door on the back of the transmitter. 3. Install 4 fresh "AA" alkaline batteries into the molded battery compartment of transmitter. Noting correct location {polarity Re-install the battery door onto the back of transmitter.
EEA Assemble two pes of side stand as photo shown. 2. Install two pes of long tube between two side stand as photo shown, 3. Install four pes of EVA on the hull support as shown. This will protect the hull bottom from scratches during construction and storage. TAKE BOAT & SAILS OUT FROM BOX 1. Take inner cardboard box out, disassemble two pes pinch plate as photo shown. 2. Use cross-head screwdriver to remove two pes of screws underneath the boat central spar as photo shown.
3. Place the boat on the display stand for next step assembly. 4. Take Sails & Mast & Booms set {per-installed} out from box. PLE EA] 1. insert Mast on the mast mount located on the central spar as photo shown. 2. Use cord on rear end of central spar to attach to hook of back stay crane as photo shown. Adjust cord bowsprit to pull the back stay cord tight and straight.
3. Use cord on front end of central spar fo attach to hook of back stay crane as photo shown. Adjust cord bowsprit to pull the forestry cord tight and straight. 4. Use forestry cord on jib sail tip to attach to hook of forestry fitting. 5. There is cord loop which attached to the silicone ring on central spar, use this cord loop to attach to hook underneath the jib boom. Adjust the silicone ring to pull cord tight.
6. Use jib boom cord to thread through the second boom bend eye {from front side back to rear side) located in central spar, thread through the sheeting deck eyelet on forward cross beam, attach cord loop to the pin as photo shown. 7. Use main boom cord to thread through sheeting deck eyelet on center of cross beam, then thread through sheeting deck eyelet on forward cross beam, attach cord loop to the pin as photo shown.
3. Switch on the receiver by pushing the push rod forward to position “on”. This moment the receiver green light will be on,and steering servo and sailing serve in boat are under control correspondingly of radio control. ON-OFF TRANSMITTER & RECEIVER BINDING The binding process effectively ties the transmitter and receiver together. Under normal circumstances, both items ans supplied like this from the factory.
8. Adjust the silicone ring on central spar to pull jib boom tight. 7. Push down transmitter throttle stick {left stick) til its lowest position. This will make winch serve pull jib boom cord and main boom cord tight. 8. Adjust A silicone ring on main boom’s position to make sure main boom is on the center line of cross beam when winch serve pull main boom cord tight . 9.
How To Sail BINARY Wind V Wind Abeam Silas: Each at a position of 45° Rudder: In center position Quarter Les PF Salas: Letting both out a little more Rudder: to the left ND Co Bearing Away Sails: Let both out "ne so as not to shiver | “Rudder: To the left Starboard Tack Running Sails: Letting both out to their maximum | position Rudder: To be held at Rudder: in center Vo the center as long as the : T / sails do not shiver | I Port Tack — Close — Hauled Salas: Keeping pulled In Sails: Keeping pulled in Rudde
IMPORTANT NOTICE: 1. Sail your BINARY only in still bodies of water. Never sail your boat in running water such as streams or rivers, as it is easy to loss control of your boat. 2. Do not sail BINARY in heavy winds. 3. Never attempt to swim after a stalled or stuck boat! Wait patiently for the wind currents to rectum the boat to shore. 4, After running, remove the deck and allow the interior of the boat to dry out completely.