3 Talking-Pi Maker-Case Case-Set
3 Talking-Pi Maker-Case Index 1. Introduction 2. Security Informations 3. Content 4. Assembly 5. Support Export 16.02.
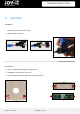
Talking-Pi Maker-Case 1. Introduction Dear customer, Thank you for choosing our Talking-Pi product. In this manual we will show you how to assemble your Maker-Case for use. If, however, problems should occur while working with your talking pi, please feel free to contact us. Current instructions, projects and a community forum can also be found here: Talking-Pi Website Export 16.02.
3 Talking-Pi Maker-Case 2. Security Informations Please note the following safety instructions for protection against electric shock and injury. Keep operating instructions and safety instructions in a safe place! If the device is passed on to third parties, these must be absolutely given along with the device. Use this device only for the respective area of application and according to the operating instructions.
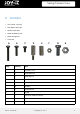
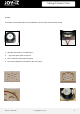
3 Talking-Pi Maker-Case 3. Content Case (wood, 7-pieces) Push-Button with LED Speaker with cable Cable-Set Button/ LED Cable Microphone Screw-Set A B C D E F G Image Quantity Name A 4 Scree M2,5 x 16 B 4 Screw M2,5 x 10 C 6 Screw M2,5 x 5 D 2 Spacer M2,5 x 11 with 1x internal- & 1x external-thread E 4 Spacer M2,5 x 11 with 2x internal-thread F 20 Nut M2,5 G 4 Screw M4 x 10 H 4 Nut M4 7 Case-Parts made from wood 1 Speaker 2 Cable Export 16.02.
3 Talking-Pi Maker-Case 4. Assembly LED-Button: Insert the LED lamp into the socket. Mikroschalter einsetzen. 2 1 3 Microphone: Insert screws (4x B) through the wooden case and tighten each with one nut (4x F) Fit the microphone board and fasten it with nuts (4x F). 2 3 1 Export 16.02.
3 Talking-Pi Maker-Case Insert the push button: Insert the push button. Pay attention to the notch (arrow) here. Put on the plastic ring. Fix knob with plastic nut Insert the LED and push-button module and snap it in place with a light twist. Make sure that the microswitch is opposite the white button contact. 1 5 4 Export 16.02.
3 Talking-Pi Maker-Case Speaker: First solder the enclosed cable to the loudspeaker. All four cable ends should be tinned. 1. Wooden plate with the 7 middle holes.... 2. … place the spacer plate on top of it. 3. Push screws (4x G) through both plates. 4. Put on the loudspeaker and fasten it with nuts (4x H). 1 2 4 3 Export 16.02.
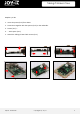
3 Talking-Pi Maker-Case Raspberry Pi 3B: 1. Insert the spacer (2x D) from above. 2. Screw them together with the spacers (2x E) on the underside. 3. Screws (2x C).... 4. ... with spacer (2x E). 5. Attach the Talking-Pi board with screws (2x C). 1 2 4 Export 16.02.
3 Talking-Pi Maker-Case Optional display: If a display is to be installed, the opening must be broken out. 1. Use a cutter knife to carefully cut the fixing points... 2. ... and break out. 3. Fasten screws (4x A) through the case and tighten with two nuts (8x F) each. 4. Fit the display and fasten it with nuts (4x F). 2 1 3 Export 16.02.
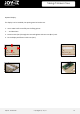
3 Talking-Pi Maker-Case Cabling: Now connect the enclosed cable to the button (LED) and the Talking Pi (BUTTON). The microphone, loudspeaker and display can also be connected. A B C D A: LED B: Button C: LED D: Button C If the LED does not light up, plug A and C must be replaced. A B D Button/LED Microphone Speaker Export 16.02.
3 Talking-Pi Maker-Case Assembly: Now the case can be plugged together as shown in the pictures. Export 16.02.
3 Talking-Pi Maker-Case 5. Support We also support you after your purchase. If there are any questions left or if you encounter any problems please feel free to contact us by mail, phone or by our ticket-supportsystem on our website. E-Mail: service@joy-it.net Ticket-System: http://support.joy-it.net Phone: +49 (0)2845 98469 – 66 (11- 18 Uhr) Please visit our website for more informations: www.joy-it.net Optional accessories: More products from Joy-IT: SBC-LCD-16x2 RB-TalkingPi Export 16.02.