
User manual


Ausgabe 04.08.2017 Copyright by Joy-IT 6
3
2. Connecting & programming the ESP8266
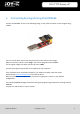
Connect the ESP8266, as seen in the following image, to the yellow connector on the programming-
module.
There is a small switch next to the yellow connector (also visible in the image).
Make sure that this switch is set to Prog if you want to programm your ESP8266.
For the regular usage, this switch needs to be set to UART.
Connect the programming module to an USB-Port of your computer.
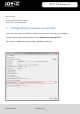
If the automac driver installaon should fail, you need to manually install the drivers.
Download the Driver-Installaontool and install the driver.
Aer the installaon is complete, make sure that the right port is chosen in your Arduino
conguraon.
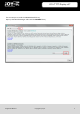
The installed ESP8266 package comes with some great programming examples for starng with the
ESP8266.
Just pick one and transfer it to your module.
JOY-iT TFT-Display 1.8“