3 ESP8266 Prog Ausgabe 04.08.
3 ESP8266 Prog Index 1. Configurating the software environment 2. Connecting & programming the ESP8266 3. Support Ausgabe 04.08.
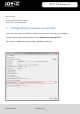
JOY-iT TFT-Display 1.8“ Dear customer, thank you for purchasing our product. Please find our instructions below. 1. Configurating the software environment At first you need to prepare the Arduino software environment for the usage with an ESP8266. Therefore, please add the following address to the additional Board-Manager URLs: http://arduino.esp8266.com/stable/package_esp8266com_index.json Ausgabe 04.08.
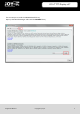
3 JOY-iT TFT-Display 1.8“ The next step is to install the ESP8266 board-library. Open up the Boards Manager and install the ESP8266 library. Ausgabe 04.08.
3 JOY-iT TFT-Display 1.8“ As soon as you finished the installation, you can choose the Generic ESP8266 Module from the list of the available boards. Your Arduino software environment is now prepared for the usage with an ESP8266. Ausgabe 04.08.
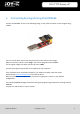
3 2. JOY-iT TFT-Display 1.8“ Connecting & programming the ESP8266 Connect the ESP8266, as seen in the following image, to the yellow connector on the programmingmodule. There is a small switch next to the yellow connector (also visible in the image). Make sure that this switch is set to Prog if you want to programm your ESP8266. For the regular usage, this switch needs to be set to UART. Connect the programming module to an USB-Port of your computer.
3 3. JOY-iT TFT-Display 1.8“ Support We also support you after your purchase. If there are any questions left or if you encounter any problems please contact us by mail, phone or by our ticket-supportsystem. E-Mail: service@joy-it.net Ticket-System: http://support.joy-it.net Phone: +49 (0)2845 98469 – 66 (11:00 - 18:00) For more informations, please visit our website: www.joy-it.net Ausgabe 04.08.