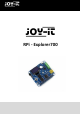
3 3 RPi - Explorer700 Ausgabe 07.12.
3 RPi - Explorer 700 Contents 1. Connections 2. Introduction 3. Connecting the expansion board and the RPI 4. LED sample programs - Changing the LED status 5. Key sample programs 6. PCF8574 sample programs - I/O expansion demos 7. BMP180 sample programs - Barometer Demos 8. DS3231 sample programs - High precision RTC Demos 9. DS18B20 sample programs - Temperature sensor Demos 10. IRM sample programs - Infrared reflective sensor 11.
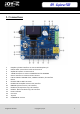
RPi - Explorer700 1. Connections 1. 2. 3. 4. 5. 6. 7. 8. 9. 10. 11. 12. 13. 14. 15. 16. Raspberry Pi GPIO interface: to connect with Raspberry Pi USB to UART: control the Pi with serial terminal AD/DA IO interface: screw terminal 1-WIRE interface: to connect 1-WIRE devices like DS18B20 Sensor interface: to connect various sensors 0.
3 RPi - Explorer700 2. Introduction Raspberry Pi Expansion Board, Miscellaneous Components, All-in-One 3. Connecting the expansion board and the RPI The Explorer700 expansion board supports the Raspberry Pi A+ / B+ / 2 / 3 Model B. Before running the sample programs, please make sure the Explorer700 is connected to the RPi and the RPi is powered up by the USB power supply. Without the RPi main board, the sample programs cannot be used on the expansion board.
3 RPi - Explorer700 4. LED sample programs - Changing the LED status bcm2835 program: Open the Linux terminal and enter to the corresponding path and run the following commands: The command for compiling the program: pi@raspberrypi ~/Explorer700/LED/bcm2835 $ make The command for executing the program: pi@raspberrypi ~/Explorer700/LED/bcm2835 $ sudo ./led Expected result: The LED1 is blinking. Press the keys Ctrl+C to end the program.
3 RPi - Explorer700 sysfs program: Enter the Linux terminal, and run the following commands: The command for compiling the program: pi@raspberrypi ~/Explorer700/LED/fs $ make The command for executing the program: pi@raspberrypi ~/Explorer700/LED/fs $ sudo ./led Expected result: The LED1 blinks 10 times and then the program will automatically quit. Press the keys Ctrl+C to end the program.
3 RPi - Explorer700 5. Key sample programs bcm2835 program: Enter the Linux terminal, and run the following commands: The command for compiling the program: pi@raspberrypi ~/Explorer700/KEY/bcm2835 $ make The command for executing the program: pi@raspberrypi ~/Explorer700/KEY/bcm2835 $ sudo ./key Expected result: Press the center key of the joystick, and the terminal will display the following information: Key Test Program!!!! KEY PRESS KEY PRESS KEY PRESS Press the keys Ctrl+C to end the program.
3 RPi - Explorer700 Expected result: Press the center key of the joystick, and the terminal will display the following information: Key Test Program!!! KEY PRESS KEY PRESS KEY PRESS Press the keys Ctrl+C to end the program. python program: Enter the Linux terminal, and run the following commands: The command for executing the program: pi@raspberrypi ~/Explorer700/KEY/python $ sudo ./key.
3 RPi - Explorer700 6. PCF8574 sample programs - I/O expansion demos bcm2835 program: Enter the Linux terminal, and run the following commands: The command for compiling the program: pi@raspberrypi ~/Explorer700/PCF8574/bcm2835 $ make The command for executing the program: pi@raspberrypi ~/Explorer700/PCF8574/bcm2835 $ sudo ./led Expected result: The LED2 is blinking. Press the keys Ctrl+C to end the program.
3 RPi - Explorer700 python program: Enter the Linux terminal, and run the following commands: The command for executing the program: pi@raspberrypi ~/Explorer700/PCF8574/python $ sudo python led.py Expected result: The LED2 is blinking. Press the keys Ctrl+C to end the program. Enter the Linux terminal, and run the following commands: The command for executing the program: pi@raspberrypi ~/Explorer700/PCF8574/python $ sudo python pcf8574.
3 RPi - Explorer700 fs program: Enter the Linux terminal, and run the following commands: The command for compiling the program: pi@raspberrypi ~/Explorer700/PCF8574/fs $ make The command for executing the program: pi@raspberrypi ~/Explorer700/PCF8574/fs $ sudo ./led Expected result: The LED2 is blinking. Press the keys Ctrl+C to end the program.
3 RPi - Explorer700 7. BMP180 sample programs- Barometer Demos bcm2835 program: Enter the Linux terminal, and run the following commands: The command for compiling the program: pi@raspberrypi ~/Explorer700/BMP180/bcm2835 $ make The command for executing the program: pi@raspberrypi ~/Explorer700/BMP180/bcm2835 $ sudo ./BMP180 Expected result: The terminal will display the following information: BMP180 Test Program ... Temperature: 34.20 C Pressure: 1005.12 Pa Altitude: 67.
3 RPi - Explorer700 python program: Enter the Linux terminal, and run the following commands to execute the program: pi@raspberrypi ~/Explorer700/BMP180/python $ sudo python BMP180_example.py Expected result: The terminal will display the following information: Temperature: 34.20 C Pressure: 1005.12 Pa Altitude: 67.66 m Press the keys Ctrl+C to end the program. 8.
3 RPi - Explorer700 wiringPi program: Enter the Linux terminal, and run the following commands: The command for compiling the program: pi@raspberrypi ~/Explorer700/DS3231/wiringPi $ make The command for executing the program: pi@raspberrypi ~/Explorer700/DS3231/wiringPi $ sudo ./ds3231 Expected result: The terminal will display the following information: start..........
3 RPi - Explorer700 9. DS18B20 sample programs - Temperature sensor Demos (Notes: To use the DS18B20 program, you should add a line dtoverlay=w1-gpio-pullup to the end of the Raspberry Pi boot file /boot/config.txt, and restart the RPi to make it take effect. For more detailed information, please refer to the relative Raspberry Pi documents.) sysfs program: Enter the Linux terminal, and run the following commands to execute the program: pi@raspberrypi ~/Explorer700/DS18B20/fs $ sudo .
3 RPi - Explorer700 10. IRM sample programs - Infrared reflective sensor bcm2835 program: Enter the Linux terminal, and run the following commands: The command for compiling the program: pi@raspberrypi ~/Explorer700/IRM/bcm2835 $ make The command for executing the program: pi@raspberrypi ~/Explorer700/IRM/bcm2835 $ sudo ./irm Expected result: Press the keys on the infrared remote controller, and the terminal will display the relative value of the pressed key.
3 RPi - Explorer700 python program: Enter the Linux terminal, and run the following commands to execute the program: pi@raspberrypi ~/Explorer700/IRM/python $ sudo python irm.py Expected result: Press the keys on the infrared remote controller, and the terminal will display the relative value of the pressed key. IRM Test Start ... Get the key: 0x0c Get the key: 0x18 Get the key: 0x5e Press the keys Ctrl+C to end the program. Ausgabe 07.12.
3 RPi - Explorer700 11. UART sample programs - Transmitting the serial data received Notices: The serial port of RPi is set to terminal debugging mode by default. However, in order to run this sample program, you should disable the terminal debugging function, which means you cannot debug the RPi via the serial port communication any more. In this case, you should employ other methods to debug the RPi before running this program.
3 RPi - Explorer700 12. OLED sample programs bcm2835 program: Enter the Linux terminal, and run the following commands: The command for compiling the program: pi@raspberrypi ~/Explorer700/OLED/bcm2835 $ The command for executing the program: pi@raspberrypi ~/Explorer700/OLED/bcm2835 $ sudo ./main Expected result: The OLED shows the LOGO of Waveshare for 2 seconds, and then it will switch to display the current system time. Press the keys Ctrl+C to end the program.
3 RPi - Explorer700 python program: When using this python program to control the OLED, you need to install another library pythonimaging. To install the python-imaging library, you should connect the RPi to the network, and use the line below: sudo apt-get python-imaging Expected result: Entering the following commands under the Terminal to execute the program, you will get different displayed information. pi@raspberrypi ~/Explorer700/OLED/python $ sudo python oled.
3 RPi - Explorer700 13. Libraries Installation for RPi In order to use the API examples we provide, related libraries are required, which should be installed manually. bcm2835 libraries wiringPi libraries 13.1 Install WiringPi Library Click to download the wiringPi libraries, or you can also obtain the latest version from the WiringPi website: https://projects.drogon.
3 RPi - Explorer700 13.3 Install Python Library Python Libraries for Raspbian (contain RPi.GPIO and spidev installation packages. See: https:// pypi.python.org/pypi/RPi.GPIO https://pypi.python.org/pypi/spidev ) get it by apt-get commands. Please take a note, your Raspberry Pi should be connected to the network when using the command apt-get to install the library. Before the installation, you can run the following command to update your software list. sudo apt-get update 1.
3 RPi - Explorer700 13.4 Configuring the interfaces (Before running the API codes we provided, you should start up the corresponding core drivers of the interfaces. In the ready-to-use system image file, both I2C and SPI are set to Enable by default, but the serial port is still in the terminal debugging function mode.) 1. Enable the I2C function. Run the following command to configure your Raspberry Pi board: sudo raspi-config Select Advanced Options -> I2C -> yes, to start up the I2C core driver.
3 RPi - Explorer700 14. Code example download Code examples 15. Support If you have any questions , or problems please contact us via e-mail, phone or support system. E-Mail: service@joy-it.net Support-System: http://support.joy-it.net Phone: +49 (0)2845 98469 – 66 (11 AM - 6 PM) Please visit our website for more information: www.joy-it.net Ausgabe 07.12.