
Beginner's Guide


2. Image: You can insert an existing image or photo from the Media Manager or upload a new
image.
3. Pagebreak: inserts a pagebreak in your article
4. Read More: allows you to stipulate where to place the read more link
5. To g g l e E d i t o r : switches the editor on and off. If it is off, you will see the HTML code of your
article.
Options
What was called Parameter in Joomla 1.5, is now called Options in Joomla 1.6, like, for example, the
Publishing Options. Here you can specify who wrote the article (Created by). The user who created the article
is usually allowed and responsible for making changes to the article later. Which name is really shown
below the title at the webpage is configured in Created by Alias. The three fields below allow you to
schedule the publishing. Simply enter the appropriate dates and Joomla takes care of the rest.
More Options
In this section you can configure many options by switching them on and off. You can change the
article layout to suit the reader's and search engine's needs. Just start experimenting - it's the best way to
learn.
Permission
The sixth and final area concerns the permissions for this article. This selection will help us in many
places in Joomla 1.6 and I will cover this in chapter Users and Permissions.
SAMPLE ARTICLE
Let's create the article outlined above together:
A text with one or more images
Just write your text. To add an image or images, there are numerous possibilities:
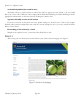
1. The image is already available online, for example, on Flickr
44
.
In this case, click the image icon in the editor toolbar and copy the image URL to the dialog box.
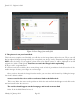
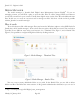
2. The image is already in the Joomla Media Manager.
In this case, click the image button below to select the image and insert it into your text (Figure 4).
Joomla! 2.5 - Beginner’s Guide
Monday, 30 January 2012! Page 82
44
http://www.flickr.com/photos/hagengraf/5186325015/sizes/s/