
User's Manual


132
When the New button is pressed, the Module:[New] screen displays all of the Module Types available for
new new Module. You can select the desired type either by clicking on the Module Name or by clicking on
the Module's radio button and pressing the Next button on the toolbar. Note that you can cancel this action
by pressing the Cancel button on the toolbar.
A standard Joomla! installation includes different Module Types. Each has it's own function and it's own
Parameters, some are described below.
Custom HTML
This allows you to create a Module that contains any valid HTML code. There are many cases where you
might want to put free-form HTML inside a web page. For example, you might want to create an HTML
Image Map or you might want to copy HTML code from PayPal, Amazon, or some other site.
The Custom HTML Module allows you to create a self-contained HTML unit and then put it in any valid
location on a page.
Custom Output
When you create or edit a Custom HTML Module, an editor session is opened using your default editor.
Important Note: The TinyMCE editor does not allow you to enter certain HTML tags. To work around this,
you can temporarily change your User's editor to "No Editor", create the Custom HTML Module, and then
change the editor back to TinyMCE. Another option is to use an editor from an Extension that allows
HTML code to be entered. Ripplenet have installed the JCE editor, which is better suited to pages that have
embedded coding.
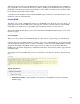
An example of a Custom HTML editor session is shown below. Note that the "No Editor" option is being
used.
Module Parameters
· Module Class Suffix. A suffix applied to the CSS class of the Module. This allows individual
Module styling.