
Installation Manual


Select the Import tab in PHPMyAdmin and then browse to the correct directory from the
joomla_root/installation/sql/mysql directory and select the edited joomla.sql file. Click Go and the data
is imported into the database to create the table structure of the installation. Replace
joomla_root/installation with the correct path to the file on your local disk.
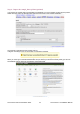
Importing joomla.sql file into prepared database
After the data is successfully installed you will notice that the Tables are now displayed in the left hand pane
of the PHPMyAdmin interface.
Successful Import of joomla.sql into the database displaying newly created Tables
The Joomla! User Documentation Team 29 The Joomla! v1.5 Installation Manual