Joomla! 1.5 Installation Manual Author: Andy Wallace Joomla! User Documentation Team Version 0.
Acknowledgements & License Acknowledgements I would like to pay tribute to the Developers for their continued efforts in putting together the remarkable Content Management System that is Joomla! 1.5. Furthermore, the same tribute is to be paid to the many other Work Group members, past and present, who have played their part in getting Joomla! to where it is today.
Changelog Version 0.4 Date Details 30 Oct 2007 Version 0.5 25 Oct 2007 Added notes to Minimum Requirements 23 Oct 2007 Added to Obtaining Joomla! advice on Nightly Builds and SVn 20 Oct 2007 Added to Known Issues 15 Oct 2007 Added .htaccess & php.
Table of Contents Acknowledgements & License..........................................................................................................................ii Acknowledgements......................................................................................................................................ii License.........................................................................................................................................................ii Additional License Rider...
Alpha Phase.........................................................................................................................................45 Beta Phase...........................................................................................................................................45 Release Candidacy Phase...................................................................................................................45 Stable Phase - Full Release.........................................
Introduction Well you have made the most important choice so far, by selecting Joomla! 1.5 as your choice of Content Management System (CMS). Joomla! is currently one of the most popular and effective Open Source projects and has won a number of prestigious awards in its short, but illustrious existence. Joomla! 1.5 is the second, main incarnation of the Joomla! series of releases. The original Joomla! 1.
Minimum System Requirements To successfully install and use Joomla! you must have a fully operational Web server (Apache is the optimum), a database (MySQL is the optimum) and the server side scripting language PHP together with specific modules that are activated within PHP for MySQL, XML, and Zlib functionality amongst others. Note: Joomla! is developed and tested primarily on the Apache Web server versions 1.3.x + and 2.x +.
Localhost or Remote Host Installations A localhost is a Web server and associated database that is set up directly on your computer or that may be on a local network either within your home or business environment. You have direct easy access to the machine upon which the software is situated A remote host is one that you access via the internet it may be owned by you or you may rent it from a dedicated hosting company.
Joomla! can be used with alternative Web servers such as Microsoft© Internet Information Service (IIS) as well as alternative database models (database work is very much in its infancy though), but these are not paths we intend exploring in this manual as Joomla! is primarily developed for use on the AMP combinations already stated. Note: There is less technical community support currently available for server platforms other than AMP.
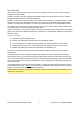
Compressed view of the output of “phpinfo” The Joomla! User Documentation Team 5 The Joomla! v1.
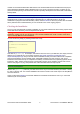
Obtaining Joomla! Getting hold of Joomla! could not be easier; simply point your mouse to the Main Joomla! page http://joomla.org and click the latest release identified in the special Module in the left-hand menu – referenced by the box highlighter. You will note that both the 1.0.x and the latest 1.5.x releases are available but we are only interested in the 1.5. Joomla! Main page displaying the download Module Click the 1.
The box highlighter is showing the .zip variant of the three available compression types of download; in addition there are .tar.gz and .tar.bz2 types. Just select the one appropriate for your operating system. A download pop-up will appear, and you should save the file to an appropriate location on your hard drive. Joomla! Code screen with download pop-up displayed Open the file on your local hard drive using the appropriate compression program for the type of file.
Uncompress (Extract) the package to a suitable location - it is not important where this happens to be so long as you can find the files again when it comes to installing them onto the Web server. The resulting list of directories and files that you will have within your directory will be similar in appearance to the following: The uncompressed Joomla! 1.5 distribution file pack Nightly Build Whilst Joomla! 1.
SVN Warning!: This is not recommended for novice and/or normal Users. It is a code Development tool and has the complexities to match! It should not be used for live sites. SVN gives you the absolute latest download at the precise moment you request it.
Final Preparation Transferring the files The first task is to upload the uncompressed collection of files that you created during the last section to your Web server. If you are installing on a localhost - for example the computer you are working on – then it is simply a case of copying and pasting (or moving) the files into the root folder (or a sub-folder) of the Web server.
MySQL Details Warning!: Make sure that the database is configured with the UTF-8 MySQL collation and that any changes you make to files is also saved as UTF-8 No BOM encoding. ● the host name for your database – if you are installing locally or on a dedicated, remote host – this host name is likely to be localhost.
● password – the password you enter to confirm your identity and therefore access the Joomla! Web site root directly with the FTP client program. This should be different to that which may have been set by your hosting company for the main Web server, where applicable. ○ ● host – the URL address of the FTP server for access to your Web site. If you are running this on a local machine (non-Windows only) then this address will typically be 127.0.0.1.
Secure Password Thinking Any password you create for Joomla!, MySQL, Apache, or in fact any passwords you ever create should be made as secure as possible.
Installation We are now ready to proceed with the actual installation of the Joomla! program onto the Web server. There are two ways of installing Joomla! The first – Web Browser Installation - can be considered easier than the second - Manual Installation - really as a result of the number of steps that are required. Either will work with a little patience and concentration to detail.
Web Browser Installation The browser installation method of installing Joomla! is the far straighter forward of the two methods and is what is hoped to be a typical installation. Whilst it is relatively easy it is only a semi-automatic method as you do still have to enter some details during the process. However, the “hard” work is done for you by the installer software itself.
Full details of the language packs currently available can be found within the Joomla! Developer Network site in the Menu Module on the left of the page. Reproduced below for convenience: Copyright & Licence explained Accredited Translations / Translation Partners Translation Policy Translation Manual Accredited translations are those that have been approved by Joomla!.
Step 2 - Pre-installation Check The next screen is Joomla!'s confirmation of what you hopefully already know if you followed the earlier advice of using phpinfo(). The screen shows whether your server meets all the necessary criteria to successfully complete the installation. Pre-installation Check Screen If any of the responses in the first section are set to No (with the exception of the configuration.
Step 3 - License There is nothing to actually enter, or change, on the License screen however, it is recommended that you read, understand, and agree to the terms and conditions under which Joomla! is released. Please note that whilst there is no specific agreement option (nor indeed a registration process) within this screen by using Joomla! you are confirming your agreement to the terms and conditions of it. The GNU GPL Version 2.
Step 4 - Database Configuration We now enter the final, and you could say, most important stages of the browser installation. This step establishes the information Joomla! requires in order to communicate with your database. The Database Configuration Stage Screen You now require the information you (hopefully) secured earlier in this guide. Select the database type from the drop down list, which includes mysql and mysqli by default. Typically you will select mysql for your database choice.
Your Database Configuration will now look similar to the following: Completed Basic and Advanced Settings of the Database Configuration page Once all the necessary settings have been entered correctly, click Next. Note: We will detail some of the common problems and solutions in the Error Handling section at the back of this manual rather than blur the picture at this stage. The Joomla! User Documentation Team 20 The Joomla! v1.
Step 5 - FTP Configuration Due to file system permission and PHP Safe Mode restrictions on certain Linux based server hosts, a facility has been introduced in Joomla! 1.5 that will allow all authorised Users to utilize the various Joomla! Installation & upload processes available within the Control Panel. These include the Media Manager as well as the Installation Manager. The FTP layer exists to handle file system manipulation.
Step 6 - Main Configuration The Main Configuration screen allows the setting of three critical elements for the installation of Joomla! to your Web server. The Main Configuration screen of the Joomla! installation process There are three sections to the Main Configuration screen; the first of which is the Site Name.
Installing the Default Sample Data The sample default data is a collection of Sections, Categories, Articles, Web Links, News Feeds, and various other examples of content that have been written simply to demonstrate some of the functionality of Joomla! (much of the content is also quite informative and useful). The data is contained in an SQL file within the core installation.
Step 7 - Finish The Finish page of the installation process Well, if you have successfully got to this page, then you have passed the first test. Congratulations! Before proceeding to view the results of your efforts you need to open the root directory of your Joomla! installation and delete the Installation Directory (highlighted in the following image) .
Once you have deleted the installation directory you can either select the Site or the Admin buttons. The former will open the Site Front-end view of your new Joomla! Web site and the latter will take you to the Administrator Back-end login screen: The Administrator Login Screen Enter the username admin and the password you entered in Step 6 of the installation process, before selecting the Login button. You will then enter the Administrator Back-end: The Administrator Back-end – Control Panel ...
Manual Installation In certain circumstances there might be a problem with using the standard Browser Installation method described, but all is not lost. It is possible to install Joomla! in a more complex, but never-the-less straightforward process provided it is completed in sequence. Step 1 – Create and edit the configuration file Open the local directory where you uncompressed the Joomla! Core distribution directories and files and copy the file configuration.php-dist.
Default configuration.php created from configuration.php-dist The Joomla! User Documentation Team 27 The Joomla! v1.
Step 2 – Edit the SQL file Open the directory installation->sql->mysql. You will be presented with the following files: Contents of installation->sql->mysql directory Open the file joomla.sql in your editor and edit the database table prefix. Use the Find and Replace command of your editor and enter #__ (hash double-underscore) in the Find field and jos_ in the Replace field and select Enter. Save the file ensuring this is done with UTF-8 No BOM encoding only.
Select the Import tab in PHPMyAdmin and then browse to the correct directory from the joomla_root/installation/sql/mysql directory and select the edited joomla.sql file. Click Go and the data is imported into the database to create the table structure of the installation. Replace joomla_root/installation with the correct path to the file on your local disk. Importing joomla.
Congratulations, you have now successfully manually created your Joomla! Web site. To verify this open your browser and enter the address (in our demonstration examples' case) localhost/joomla (replace localhost/joomla with the full URL if the installation is on a remote server) and you will see your new Web site all-be-it it will look pretty bare. You will not be able to access the site to log in and the Administrator Back-end will not be accessible as you do not yet have an admin user.
Step 5 – Create the primary administrator user account In order to create the first administrator user you must enter the following Query into the database using the MySQL administration panel (or command line). This will set the initial username as admin and the password as admin.
Enter localhost/yoursitename/administrator into the address box of your browser (replace localhost/yoursitename/ with the full URL if the installation is on a remote server), and the following screen will be displayed: The Administrator Login page of your Web site Enter the username admin and the password admin and click the Login button. Your first task must be to edit the User admin. Open the User Manager by clicking the Quick Icon on the Control Panel.
Click on the Administrator name and edit the details to your own preferences paying particular attention to the password and the e-mail address. The User: [Edit] screen with the e-mail and password fields highlighted You can select and change any of the other details as you wish to at this stage, but you probably could do with a cup of tea (or something stronger!). Congratulations, you now have access to your basic, clean installation of Joomla!.
Step 6 – Import the sample_data.sql data (optional) If you require the sample data to be installed to the database you must complete a further Import process. Select the Import tab in the PHPMyAdmin interface and browse to the renamed installation Import screen ready for the instruction to proceed with import Once the file is selected from the browser click Go. If all goes according to plan you will receive a confirmation message. Confirmation message for successful Import of the sample_data.
It is now advisable to scout around the functions of the Control Panel and see what everything can do and getting used to the Joomla! way of doing things. The Front-end display also looks considerably healthier with the Sample Data installed. Spend some time navigating around and getting a feel for Joomla! You can Login to the Front-end using the same username and password as you do for the Back-end. A more secure alternative is to have a separate username and password for Front-end access.
Step 7 – Finish Delete the installation directory If you did not delete the Installation directory at Step 3 before uploading the core package to the server you need to do so now. Step 7 – Delete the installation directory Warning! It is essential that the installation directory is removed as soon as you have completed the installation. Failure to do so will leave a significant security risk for your Web site.
Known Issues & Error Handling Note: We are generally holding off on compiling this section until the final release of Joomla! 1.5 is made. We will add obvious repetitive issues that have a common thread in the forums as they arise, or are identified by the Developers and Quality and Testing Work Groups. configuration.
php.ini An alternative is to try to use a php.ini file method instead. Again, this is an option that must be available with your Web server Host. Create a new file and save it as php.ini and include one of the following lines of code. register_globals = 0 (this is a zero numeral) or enter register_globals = Off or enter register_globals = "Off" Place a copy of the php.ini file in both the joomla_root/ and the joomla_root/administrator/ directories.
Nightly Build and SVN Whilst Joomla! 1.5 is still in its development stages (currently RC3) changes are made to the code to correct bugs and to improve stability on an almost hourly basis sometimes. The following methods (other than the "Fresh Installation" do require some considerable patience at times to get working properly and should not be followed unless you are sure you want or need the latest versions available.
SVN This is not recommended for novice Users. It is a Development tool and has the complexities to match! If you are looking to develop Joomla! Extensions, learn the ins-and-outs of precisely how Joomla! is put together, or are working on a particular project that demands the absolute latest version of Joomla!, and for those helping test Joomla! to assist with the development and Quality and Testing process then we recommend using Subversion (SVN).
Help Us to Help You A few simple facts to start things off: • Joomla! is not a commercial business • there are no paid employees • everyone within the Core Team gives their time freely and for free • everyone within the various Work Groups give their time freely and for free • everyone is a VOLUNTEER; • everyone involved with the development and support of the Project have real lives, jobs, and families outside of Joomla! • to many Joomla! is far more than a just a hobby, it is a passionate ext
• 7. Please make sure your question doesn't fit in elsewhere in a different, specialized board. Please consider what your query really relates to. As a brief guide to this: General Forum: for all questions relating to Joomla 1.5 that do not relate to any of the other Board Titles. If it is not a question about Joomla! 1.5 specifically or a Extension etc then it does not belong here.
Posting a New Topic (or when joining an existing thread with the same issues) Once you have looked for similar responses in the appropriate Fora and you decide you do need to start a new Topic, please be sure to include: A Descriptive Title - please do not just say "Help Needed", "Joomla! won't work", "It's Broken"...
Successful Ending Once your question has been answered: • • 1. Please amend your first post - the topic starter - by clicking Modify in that post and selecting the Solved option from the Message icon: drop down list and then save your post to exit. You will notice a green circle with a tick in it is appended to your Topic Subject. This tells others that the problem has been solved and may well answer other people's queries. 2.
Further Information Details will be added in due course to this section. Typically this will comprise links to resources within the Joomla! Sphere of operations, plus external resources of general use. What to expect whilst Joomla! 1.5 is in development Joomla! 1.5 has been some time in its development as the Developers - with the asistance of the vast Joomla! Community - strive to make this an even better Content Management System than it already is.
Version Convention Joomla! release versioning follows a numerical convention comprised of three numbers: Major, Minor and Maintenance. The version is presented in the major.minor[.maintenance] format. Major Release Number (X.1.1) An increment of the major number generally indicates a major rework or rewrite of the code base. May be completely incompatible with prior major releases. Minor Release Number (1.X.