
Owner Manual

DHBWN – Rev. G – 21 October 2019
800-543-4149
507-342-5169
www.jonti-craft.com Page 2 of 2
Jonti-Craft, Inc.
171 Hwy 68
P.O. Box 30
Wabasso, MN 56293
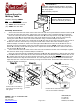
4. Now attach the assembly from Step #2 to side J with four 2” decorative screws. Tighten the 2”
decorative screws using the provided 4mm hex wrench.
5. Attach assembly B,F,G to side J by inserting through side J three 2” decorative screws for the
desktop F. Also insert through side J and into the back rail G one 2” decorative screw. Tighten the 2”
decorative screws using the provided 4mm hex wrench.
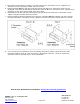
6. Attach bottom rail I to side J by inserting through side J and into rail I two 2” decorative screws.
Tighten using the provided 4mm hex wrench.
7. Attach remaining side H to assembly from Step #2, assembly B,F,G and bottom rail I by inserting
through side H ten 2” decorative screws. Tighten the screws using the provided 4mm hex wrench.
8. If you experience any difficulties when assembling this product, please contact the Jonti-Craft
Customer Relations Team at (800) 543-4149 or sales@jonti-craft.com. All other requests for
assistance must be directed to your Jonti-Craft Dealer.
General Care & Maintenance Guidelines: www.jonti-craft.com/generalcare