
Install Instructions
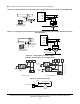


Table Of Contents
- Applications
- North American Emissions Compliance
- United States
- Canada
- Installation
- Parts Included
- Location Considerations
- Installing the Thermostat Controller
- Wiring
- Setup and Adjustments
- Overview
- Customizing the Home Screen
- Touchscreen Icons
- User Lockout
- Using the USB Port
- Loading the Firmware
- Backing Up the Settings
- Restoring the Settings
- Choosing the Communication Mode (TEC3620-00-000, TEC3621-00-000, TEC3622-00-000, and TEC3623-00-000 Models)
- Configuring the Thermostat Controller
- Installer Configuration Menu
- Screen Reset
- Selecting the Unit Type
- By default, the thermostat controller is configured for 4-pipe fan coil mode. To change to a 2-pipe or Pressure-Dependent VAV mode:
- Configuring the Supply Fan - Fan Coil Only
- Setting the Control Mode
- Setting the Fan Mode - Fan Coil Only
- Configuring the Zone Space or Equipment Size
- Changeover
- Dehumidification Control - Fan Coil Only
- Temperature Setpoints
- Configuring Occupancy
- Selecting Schedule Source
- Scheduling
- Setting the Local Schedule
- Overriding the Occupancy Mode
- Enabling Optimal Start
- Enabling the Motion Sensor (TEC3x21-00-000, TEC3x23-00-000 Models)
- PID/PRAC+ Automatic Control Tuning
- Configurable Binary Inputs
- Aux Control
- Commissioning Mode
- Sensor Priority
- Available Fault Diagnostics
- Menus and Submenus
- Troubleshooting
- Repair Information
- TEC3000 Series Proportional Fan Coil and Individual Zone Thermostat Controllers with Dehumidification Capability (Part 1 of 2)

TEC3000 Series Proportional Fan Coil and Individual Zone Thermostat Controllers with Dehumidification
Capability Installation Instructions
16
8. Remove the USB drive from the TEC3000 controller when the update is complete.
The TEC3000 firmware update is complete when the TEC3000 restarts and returns to the home screen.
Backing Up the Settings
1. Ensure that the TEC screen is on.
2. Insert the USB drive into the right side of the TEC.
See Figure 1 for the USB port location.
3. Press the Menu icon.
4. Scroll down the menu and press Update.
5. Press Backup.
A message appears stating that the file is saved locally and on a USB drive.
6. Press Confirm to save locally and on USB.
The setting files are named based on the TEC3000 model name, date, and time stamp
(for example, TEC3311-00_2015-10-08T1). The files are saved locally and on the USB drive’s root directory.
See Troubleshooting
if the settings are not backed up correctly.
7. After the settings are saved onto the USB drive, remove the USB drive from the TEC3000.
Restoring the Settings
1. Ensure that the TEC screen is on.
2. Insert the USB drive into the right side of the TEC.
See Figure 1 for the USB port location.
3. Press the Menu icon.
4. Press Update.
5. Press Restore.
6. Select Local Storage or the correct configuration file created from a previous backup operation.
The setting files are named based on the TEC3000 model name, date, and time stamp
(for example, TEC3311-00_2015-10-08T1). The files are saved locally and on the USB drive’s root directory.
7. Press Confirm if you have the correct file name.
The settings are loaded from the USB drive.
8. After the settings are loaded from the USB drive, remove the USB drive from the TEC3000.
Choosing the Communication Mode
(TEC3620-00-000, TEC3621-00-000, TEC3622-00-000, and
TEC3623-00-000 Models)
1. Ensure the TEC screen is on.
2. Press the Menu icon.
3. Press Network Setup.
4. Press FC Comm Mode.
5. Select BACnet or N2 by pressing .
6. Proceed to Step 7 to perform BACnet communication and Step 15 to perform N2 communication.
7. Press
to return to the previous screen.