
Install Instructions
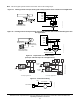


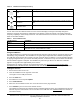


Table Of Contents
- Applications
- North American Emissions Compliance
- United States
- Canada
- Installation
- Parts Included
- Location Considerations
- Installing the Thermostat Controller
- Wiring
- Setup and Adjustments
- Overview
- Customizing the Home Screen
- Touchscreen Icons
- User Lockout
- Using the USB Port
- Loading the Firmware
- Backing Up the Settings
- Restoring the Settings
- Choosing the Communication Mode (TEC3620-00-000, TEC3621-00-000, TEC3622-00-000, and TEC3623-00-000 Models)
- Configuring the Thermostat Controller
- Installer Configuration Menu
- Screen Reset
- Selecting the Unit Type
- By default, the thermostat controller is configured for 4-pipe fan coil mode. To change to a 2-pipe or Pressure-Dependent VAV mode:
- Configuring the Supply Fan - Fan Coil Only
- Setting the Control Mode
- Setting the Fan Mode - Fan Coil Only
- Configuring the Zone Space or Equipment Size
- Changeover
- Dehumidification Control - Fan Coil Only
- Temperature Setpoints
- Configuring Occupancy
- Selecting Schedule Source
- Scheduling
- Setting the Local Schedule
- Overriding the Occupancy Mode
- Enabling Optimal Start
- Enabling the Motion Sensor (TEC3x21-00-000, TEC3x23-00-000 Models)
- PID/PRAC+ Automatic Control Tuning
- Configurable Binary Inputs
- Aux Control
- Commissioning Mode
- Sensor Priority
- Available Fault Diagnostics
- Menus and Submenus
- Troubleshooting
- Repair Information
- TEC3000 Series Proportional Fan Coil and Individual Zone Thermostat Controllers with Dehumidification Capability (Part 1 of 2)

TEC3000 Series Proportional Fan Coil and Individual Zone Thermostat Controllers with Dehumidification
Capability Installation Instructions
12
Figure 15: Binary Input Wiring
Setup and Adjustments
Overview
Figure 16 shows the thermostat controller home screen. You can customize it to show or hide various elements
from the occupant. See Table 3 for a listing of the touchscreen icons and Table 10 to identify the home screen
settings under the Display Settings. When screen customization is used in conjunction with a passcode, the
building owner can control which options the occupant can access and adjust.
Figure 16: Thermostat Controller Home Screen
The humidity level appears on the home screen if there is a humidity sensor in the unit, or if the thermostat
controller has a network override written to it.
Customizing the Home Screen
Customizing the Home screen settings include:
You can also show or hide these items on the Home screen:
To customize the Home screen:
1. Press the Menu icon.
2. Press Display Settings.
IMPORTANT: Table 10 provides a full list of TEC3000 menu settings. In the upcoming sections, step-by-step
instructions are included on how to access and adjust the more commonly used menus.
IMPORTANT: If lockout levels are used, some icons are hidden. Table 4 provides details of these levels.
• Brightness • Units • Time Zone • Date
• Enable Backlight • Time • Time Format • Date Format
• Fan Button • Off Button • Alarm Indication • Date/Time
• Space Temperature • Hold Button • Occupancy Status
• Humidity • Setpoint • Unit Status
FIG:Binary Input Wiring
BI1
Dry Contact
Bi2
Dry Contact