
Install Instructions


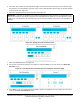


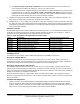
Table Of Contents
- Applications
- North American emissions compliance
- United States
- Canada
- Installation
- Parts included
- Location considerations
- Installing the thermostat controller
- Wiring
- Setup and adjustments
- Overview
- Customizing the home screen
- Touchscreen icons
- User lockout
- Using the USB port
- Loading the firmware
- Backing up the settings
- Restoring the settings
- Choosing the Communication mode (TEC3612 and TEC3613 Models)
- Configuring the network settings for wireless models
- Configuring the thermostat controller
- Installer configuration menu
- Screen reset
- Selecting the unit type
- By default, the thermostat controller is configured for four-pipe fan coil mode. To change to a two-pipe or Pressure-Dependent VAV mode:
- Selecting the heating and cooling device type
- Configuring the supply fan - fan coil only
- Setting the Control mode
- Setting the Fan mode - fan coil only
- Configuring the zone space or equipment size - units configured with floating actuators, multi- speed fans, and variable-speed fans only
- Changeover
- Dehumidification control - fan coil only
- Temperature setpoints
- Configuring occupancy
- Selecting schedule source
- Scheduling (for networked models)
- Setting the local schedule
- Overriding the Occupancy mode
- Enabling optimal start
- Enabling the motion sensor (TEC3x12, TEC3x13 Models)
- PID/PRAC+ automatic control tuning
- Configurable binary inputs
- Aux control
- Commissioning mode
- Configurable analog inputs (AIs)
- Configuring the AIs
- Networked sensors
- Availability of AIs
- Priority for configurable AIs
- Priority for overall sensors data sources
- Available fault diagnostics
- Menus and submenus
- Troubleshooting
- Repair information
- Technical specifications
- TEC3000 Series Networked and Wireless On/Off or Floating Fan Coil and Individual Zone Thermostat Controllers with Dehumidification Capability (Part 1 of 3)

TEC3000 Series Networked and Wireless On/Off or Floating Fan Coil and Individual Zone Thermostat Controllers
with Dehumidification Capability Installation Guide
36
Enabling optimal start
The TEC supports an advanced optimal start algorithm. The algorithm works in conjunction with a local schedule to
pre-heat or pre-cool the zone before scheduled occupancy periods begin, in order to bring the zone to the desired
occupied setpoint when the scheduled occupancy period begins. Occupant comfort is ensured while automatically
minimizing energy usage. This algorithm creates a model of the zone being controlled and automatically
determines when to start the equipment before the scheduled transition to Occupied. The start time automatically
adjusts daily to minimize the time between reaching setpoint and entering Occupied state.
Note: Optimal Start does not work when the schedule source is set to External.
To enable this feature:
1. Press the Menu icon.
2. Press Scheduling.
3. Press Schedule Options.
4. Press Optimal Start Enable and select Yes.
5. Press Save and the back arrow
to return to the previous screen.
Enabling the motion sensor (TEC3x12, TEC3x13 Models)
By default on models with integral motion sensing capability, the motion sensor is enabled with a default timeout of
15 minutes from the last detection of motion in the zone. On models without an integrated sensor, the default
timeout is still 15 minutes, but it only is applied when one of the two configurable binary inputs is set to be a motion
sensor (see Configurable binary inputs
for information on configuring the binary inputs). To disable motion sensing
capabilities, set the Motion Sensor Timeout to 0 minutes. See Table 8 to view the available setpoints. See Table 13
to view the setpoint values. To adjust the motion sensor timeout:
1. Press the Menu icon.
2. Press Scheduling.
3. Press Schedule Options.
4. Press Motion Sensor Timeout and adjust accordingly.
5. Press Save and the back arrow
to return to the previous screen.
PID/PRAC+ automatic control tuning
The TEC3000 features advanced proportional-integral-derivative (PID) control algorithms to maximize control
performance while minimizing excessive cycling and wear on the equipment. PID is used in conjunction with a
Multi-Stage Controller (MSC) for all occupied and standby control.
Additionally, the PID features Johnson Controls proprietary PRAC+ (Pattern Recognition Adaptive Control)
automatic tuning, which continuously tunes the controller parameters to automatically optimize the control
performance to match the equipment and zone. By default, PRAC+ is enabled and immediately begins to tune. To
reset tuning at any time to the factory defaults:
1. Press the Menu icon.
2. Press Setup.
3. Press General Control Setup.
4. Press Tuning.
5. Press Reset PID Tuning and select Yes.
6. Press Save and the back arrow
to return to the previous screen.
PRAC+ automatic tuning can also be disabled. When disabled, the controller parameters remain at their last values
until automatic tuning is re-enabled. To disable automatic tuning:
1. Press the Menu icon.