
Install Instructions


2 P-8000/T-5312/T-8000/T-8020 Technical Bulletin
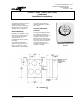
External Pilot Orifice Kit
The External Pilot Orifice Kit
(T-8000-16) is designed for use
when an 8000 series controller
is required to operate if its input
supply pressure drops below
5 psig (35 kPa) (the drop-off
point of the relay). The following
procedure should be used to
install the kit:
1. Loosen capillary clip and
rotate away from element.
2. Attach pilot air connection
and insert pilot air line into
hole provided in the back of
the instrument.
3. Reposition capillary clip and
screw in securely.
4. Connect the pilot air line to
the pilot air connection and
thread the tubing through
the hole in the instrument.
5. Remove the tubing between
the orifice holder and the
tee.
6. Attach the pilot air line to
the tee and cap the prong of
the orifice holder.
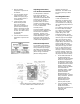
7. Install the appropriate in-line
restrictor and fitting to
match the type of tubing
selected for the particular
application. (See Fig. 4).
Adjusting Instructions;
Proportional Instruments
These proportional instruments
have been factory calibrated and
should require no additional
calibration. The T-8000 and
T-8020 have been adjusted to
approximately 8 psig (56 kPa)
output pressure at 70F (21°C),
with a sensitivity of 1 PSI/F°
(1 kPa/C°). The P-8000 has
been factory adjusted for 8 psig
(56 kPa) output pressure at
60 psig (420 kPa) on the high
pressure model, and 12 psig
(84 kPa) on the low pressure
model (both with 1 PSI/PSI
(1 kPa/kPa) sensitivity). The
T-5312 is factory set at 9 psig
(63 kPa) output pressure and
9 psig (63 kPa) input pressure,
with an 8:1 gain. However, the
temperature or pressure setting
must be made in accordance with
the job specifications. It may be
necessary to change the
sensitivity.
Sensitivity or Gain
Adjustment
The controller can be made to
function as a direct or reverse
acting instrument by changing
the position of the sensitivity
slider. Moving the slider upward
(Direct Acting) or downward
(Reverse Acting) from the
midpoint increases the
sensitivity. The slider is held
securely in place by a slotted
screw. Set the sensitivity or gain
as high as possible without
producing excessive hunting or
cycling.
Dial Adjustment
The set point dial has ranges on
both sides. If it is necessary to
use the range on the opposite
side, place the non-graduated
portion of the dial in the same
quadrant as it was originally.