
Install Instructions


Part No. 24-11256-00007, Rev. B
7
NS8000 Series
Changing the decimal separator
1. Press and hold the Up and Down icons for ve seconds until the Fahrenheit and Celsius indicator icons start to blink.
2. Press the Menu icon four times.
3. To switch between decimal point or decimal comma, press the Up or Down icon.
4. To save the new settings, press the Menu icon twice to return to the home screen or wait for ten seconds for the screen to
return to the home screen automatically.
Hiding icons on the home screen
1. Press and hold the Up and Down icons for ve seconds until the Fahrenheit and Celsius indicator icons start to blink.
2. Press the Menu icon ve times.
3. To go through each icon on the display, press the Down icon.
4. When the icon you want to hide blinks, press the Up icon to hide it.
5. To save the new settings, press the Menu icon ve times to return to the home screen or wait for ten seconds for the screen to
return to the home screen automatically.
Activating and deactivating the screen lockout
Lock the screen to prevent users from making setpoint changes or entering the commissioning mode. To activate and deactivate
the screen lockout, complete the following eps:
1. Press and hold the Menu icon for ten seconds until the Up and Down icons vanish on the display
to activate the screen lockout.
2. Press and hold the Menu icon for ten seconds until the Up, Down and Fan icons reappear to deactivate the screen lockout.
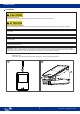
Setup and adjustments for the Warmer/Cooler (W/C) model
The non-display NS8000 W/C model uses LEDs to indicate the temperature setpoint change. The center white LED is the midpoint
of the temperature setpoint range congured in the controller. The incremental increase or decrease in temperature assigned to
the Up and Down arrows depends on the temperature setpoint adjustment set in the controller. The red LEDs indicate an increase
from the current room temperature setpoint. The blue LEDs indicate a decrease from the current room temperature setpoint.
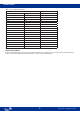
See Table 2 for further information about the LEDs.
7
6
5
4
3
2
1
LED Number Description
1 Partially lights up in red and fully lights up in red
2 Partially lights up in red and fully lights up in red
3 Fully lights up in red
4 Center LED fully lights up in white
5 Fully lights up in blue
6 Partially lights up in blue and fully lights up in blue
7 Partially lights up in blue and fully lights up in blue
Table 2: Warmer/Cooler (W/C) model LEDs