
Installation Guide


4
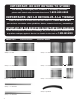
7. Place tower top (26 1/4in. shelf) into notches at top of tower.
8. Insert barrel nuts into tower sides with slot in a vertical position.
9. Insert barrel bolts into tower top
10. Flush Tower top with tower side & tighten with allen wrench provided (nut
position may need adjustment).
11. Place tower face down (nameplate typically designates tower front)
12. Place top tower bracket between 1st & 2nd groove.
13. Place middle tower bracket between 8th & 9th groove.
14. Place bottom tower bracket between last groove & tower bottom.
15. Repeat for opposite side.
16. Secure brackets to tower using #8 3/4in. screws.
STEP 4 - Installing Top Shelf & Tower
It is recommended to install hardware into wall studs. Typically 16 in. on
center. Use 50 lb. wall anchors provided if no stud is present.
On the top level line space shelf mounting L-clip hardware equidistant in
the following manner:
• 3 L-clip hardware within the 48in. shelf location
• 2 L-clip hardware within the tower top location
NOTE: AT LEAST 1 L-CLIP HARDWARE MUST BE IN-
STALLED INTO A WALL STUD AT TOWER TOP LOCATION
1. Center the top screw hole of the shelf mounting L-clip hardware with the
level line & mark all hole locations.
2. Secure L-clip to wall using #8 1 1/2 in. screws at hole locations (Use wall
anchors provided if no stud is present).
3. Repeat for remaining L-clip locations.
2 3
3 4
5
6
7 8
8 9
10 10
11 12
16
13
14
15