32961440.qxd 25/08/2008 11.
132961440.qxd 25/08/2008 11.49 Pagina 2 Important safety information It is most important that this instruction book should be retained with the appliance for future reference. Should the appliance be sold or transferred to another owner, or should you move house and leave the appliance, always ensure that the book is supplied with the appliance in order that the new owner can get to know the functioning of the appliance and the relevant warnings.
132961440.qxd ● 25/08/2008 11.49 Pagina 3 As some duvets and eiderdowns should be washed in large commercial machines because of their bulk, please check with the manufacturer of the item before washing in a domestic machine. Environmental information ● ● Maintenance and cleaning ● For information on maintenance and cleaning your washing machine see pages 23 - 24 of this instruction manual. ● WARNING: A cut off plug inserted into a 13 amp socket is a serious safety (shock) hazard.
132961440.qxd 25/08/2008 11.
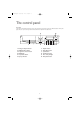
132961440.qxd 25/08/2008 11.49 Pagina 5 The control panel Important! The control panel is illustrated below. It shows the programme selector dial as well as the different buttons and the pilot lights. These are represented by relevant numbers which are explained in the table below.
132961440.qxd 25/08/2008 11.49 Pagina 6 Display and buttons 4.9 4.10 Quiet Cold Rinse hold Delay start Quick Wash time Easy Iron Intensive Stain 4.1 Prewash Extra Rinse 4.3 4.4 4.2 Multi-Display (4) 4.5 4.8 4.7 4.6 • The washing machine has completed the programme: this is indicated by a blinking zero (0). The «Door Lock» pilot light (11), the pilot light of button 10 go out and the door can be opened.
132961440.qxd 25/08/2008 11.49 Pagina 7 4.7 Wash time message: If enabled after pressing the «Start/Pause» button, it prevents any changes being made to the programmes or options selected. To enable or disable this function, press the «Temperature» and «Spin» buttons simultaneously for approx 6 seconds until the icon appears on or disappears from the display. ● • It is on when the washing cycle starts and when the duration is shown on the display.
132961440.qxd 25/08/2008 11.49 Pagina 8 «Spin» button (6) «Stain» Function Select this option to treat heavily soiled or stained laundry with stain remover (extended main wash with time optimised stain action phase). This option is not available with a temperature lower than 40°C. Attention! If you wish to perform a programme with the stain option, pour stain remover into compartment .
132961440.qxd 25/08/2008 11.49 Pagina 9 Press the button repeatedly until the desired time is displayed in the multi-display. Note! For the compatibility between a function and a washing programme, see «Washing Programmes». The selected delay time value (up to 20 hours) will appear on the display for a few seconds, then the duration of the programme will appear again. «Start/pause» button (10) The function cannot be selected in the «Drain» programme.
132961440.qxd 25/08/2008 11.49 Pagina 10 Using the washing machine Before the first wash, we recommend that you run a cotton cycle at the highest temperature, without any laundry in the machine, to remove any manufacturing residue from the drum and tub. Pour 1/2 a measure of detergent into the dispenser drawer and start the machine. Close the drawer gently. Load the laundry The running time is displayed in the multi-display. The light of the button 10 starts flashing.
132961440.qxd 25/08/2008 11.49 Pagina 11 • The washing machine is not in the heating phase beyond 55°C; • The level of the water is not high; If these requirements are met, when you pause the washing machine, the light 11 goes off and the door can be opened. If the light 11 remains lit, the door cannot be opened. In any case, do not force it! Should it not be possible to open the door, and should it be absolutely necessary to do so, switch the appliance off by pressing button 2.
132961440.qxd 25/08/2008 11.49 Pagina 12 Hints & tips on washing ● Do NOT overload the machine. Weigh the laundry the first few times you use the appliance.
2961440.qxd 25/08/2008 11.49 Pagina 13 Wash care symbols Wash care labels inside garments recommend how to launder your clothes with the best results. The care labelling code is in line with care labelling used in the rest of Europe. The symbols used make it easy to select the correct programme on your washing machine.
132961440.qxd 25/08/2008 11.49 Pagina 14 Washing programmes Type of fabric /Programme description Programme/ temperature White, fast coloured and Cottons(1) non-fast cotton items Main wash - rinses - spin at 1400 95° - COLD rpm White, fast coloured and non-fast cotton items Main wash - rinses - spin at 1400 rpm - For slightly or normally soiled cotton items. The temperature will decrease and the washing time will be extended. This allows you to obtain a good washing efficiency whilst saving energy.
132961440.qxd 25/08/2008 11.49 Pagina 15 Washing programmes Consumptions* Programme description Lingerie, underwear Main wash - rinses - spin at 900 rpm This programme is suitable for very delicate items, as lingerie, bras and etc. The maximum spin speed is automatically reduced. Programme Available options Load Energy kWh Water litres Lingerie 40° - Cold Spin reduction/ No Spin/ Rinse hold/ Quiet 1 kg 0.45 60 8 Kg 0.
132961440.qxd 25/08/2008 11.49 Pagina 16 Consumptions* Programme description Programme Available options Load Energy kWh Water litres Main wash - rinses - spin at 700 rpm Duvet, blanket of cotton or synthetic items Duvet 40° - 30° Spin reduction 2 Kg 0.6 78 Main wash - rinses - spin at 900 rpm This is a complete programme that can be used for laundry which is lightly soiled or which needs freshening up. 14 Minute wash 30° Spin reduction /No Spin/ Rinse hold 1 Kg 0.
132961440.qxd 25/08/2008 11.49 Pagina 17 Maintenance and cleaning You must DISCONNECT the appliance from the electricity supply, before you can carry out any cleaning or maintenance work. Descaling The water we use normally contains lime. It is a good idea to periodically use a water softening powder in the machine. Do this separately from any laundry washing, and according to the softening powder manufacturer's instructions. This will help to prevent the formation of lime deposits.
132961440.qxd 25/08/2008 11.49 Pagina 18 • When no more water comes out, unscrew the pump cover and remove it. Always keep a rag nearby to dry up spillage of water when removing the cover. Clean the filter using a hard bristle brush. Refit the inlet hose. P1231 P1115 The dangers of freezing • Remove any objects from the pump impeller by If the machine is exposed to temperatures below 0°C, certain precautions should be taken. ● Turn off the water tap. ● Unscrew the inlet hose.
132961440.qxd 25/08/2008 11.49 Pagina 19 Something not working Please carry out the following checks before contacting your local Service Force agent. IMPORTANT: If you call out an engineer to a fault listed below, or to repair a fault caused by incorrect use or installation, a charge will be made even if the appliance is under guarantee.
132961440.qxd 25/08/2008 11.49 Pagina 20 Symptom Solution The green Start/Pause light flashes and the display seems off ● The energy save system is enabled. Press any button to switch the appliance on. The machine vibrates when spinning ● The internal packing has not been removed. The machine is in contact with the wall or furniture. The machine is not level and stable (check diagonally). The washing load is badly distributed in the drum. Maybe there is very little laundry in the drum.
132961440.qxd 25/08/2008 11.49 Pagina 21 Description of the appliance Your new washing machine is fitted with an automatic device which detects the laundry amount in some programmes for cotton and synthetic items and chooses the best cycle parameters for washing in an economical way. Cycle time duration, energy and water consumptions are proportional to the amount of each load. This is ideal when washing different small quantities of laundry.
132961440.qxd 25/08/2008 11.49 Pagina 22 Installation It is dangerous to alter the specifications or attempt to modify this product in any way. Care must be taken to ensure that the appliance does not stand on the electrical supply cable. Any electrical work required to install this appliance should be carried out by a qualified electrician or competent person. Any plumbing work required to install this appliance should be carried out by a qualified plumber or competent person.
132961440.qxd 25/08/2008 11.49 Pagina 23 Unpacking All transit bolts and packing must be removed before using the appliance. Keep all packaging away from children. You are advised to keep all the transit bolts for re-use in case the machine is to be transported again. After removing all the packaging, with assistance carefully lay machine on it’s back to remove the polystyrene base from the bottom. Remove the power supply cable and the draining hose from the hose holders on the rear of the appliance.
132961440.qxd 25/08/2008 11.49 Pagina 24 thread connector. If this connection is not compatible with the plumbing of the existing installation, a variety of connectors are available from good hardware stores and plumbers merchants to suit most domestic plumbing. Any alteration to your existing plumbing must be carried out by a competent person, or qualified plumber.
/08/2008 ½ 11.49 Pagina 25 38 mm (½) standpipe diameter Push the drain hose onto the spigot and secure with a clip, ensure a loop is formed in the drain hose (see diagram) to prevent waste from the sink entering the washing machine. 30 cm (12") 132961440.qxd HEC0013 Loop When discharging into a standpipe ensure that the top of the standpipe is no more than 90cm (35.4'') and no less than 60cm (23.6'') above floor level.
132961440.qxd 25/08/2008 11.49 Pagina 26 Mo Pro d. ..... d. No ..... . ..... ..... . Ser . No . ..... .... Mod. .......... Prod. No. ........... Ser. No. ......... P0042 BD SHOWER SINK WASHING MACHINE The appliance is supplied with a 13amp plug fitted. In the event of having to change the fuse in the plug supplied, a 13amp ASTA approved (BS1363/A) fuse must be used. Should the plug need to be replaced for any reason, proceed as described below.
132961440.qxd 25/08/2008 11.49 Pagina 27 Permanent connection The power supply cable must be easily accessible after installing the appliance. In the case of permanent connection it is necessary that you install a double pole switch between the appliance and the electricity supply (mains), with a minimum gap of 3mm between the switch contacts and of a type suitable for the required load in compliance with the current electrical regulations.
132961440.qxd 25/08/2008 11.49 John Lewis Partnership 171 Victoria Street London SW1E 5NN www.johnlewis.