JLWM 1200 1200 spin washing machine Instruction manual
Safety information It is most important that this instruction book should be retained with the appliance for future reference. Should the appliance be sold or transferred to another owner, or should you move house and leave the appliance, always ensure that the book is supplied with the appliance in order that the new owner can get to know the functioning of the appliance and the relevant warnings. These warnings have been provided in the interest of safety.
• Any electrical work required to install this appliance should be carried out by a qualified electrician or competent person. • Do not use your washing machine to wash articles with whalebones, material without hems or torn material. • Always unplug the appliance and turn off the water supply after use and during cleaning and maintenance. • Under no circumstances should you attempt to repair the machine yourself. Repairs carried out by inexperienced people may cause injury or serious malfunctioning.
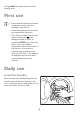
• Keep all detergents in a safe place out of children’s reach. • Make sure that children or pets do not climb into the drum. To prevent children and pets becoming trapped inside the drum the machine incorporates a special feature. To activate this device, rotate the button (without pressing it) inside the door clockwise until the groove is horizontal. If necessary use a coin.
Contents Operating instructions Safety information General safety Installation Use Child safety Installation instructions Installation 2 2 3 3 4 Detergent dispenser drawer 6 7 Control panel 7 Unpacking Positioning and levelling Plumbing in Water inlet Water drainage Special conditions In the interest of the environment Electrical connection First use 9 What to do if… Product description 13 Washing Programmes 15 Technical data 17 Consumption values 17 Care and cleaning 18 28 Repairs - A
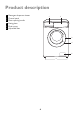
Product description 1 2 3 4 5 6 Detergent dispenser drawer Control panel Door opening handle Rating plate Drain pump Adjustable feet 1 2 3 4 5 6 6
Detergent dispenser drawer Compartment for detergent used for prewash and soak phase or for stain remover used during the stain action phase (if available). The prewash and soak detergent is added at the beginning of the wash programme. The stain remover is added during the stain action phase. Compartment for powder or liquid detergent used for main wash. If using liquid detergent pour it just before starting the programme. Compartment for liquid additives (fabric softener, starch).
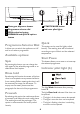
1 1 2 3 4 2 3 4 5 6 5 START/PAUSE button 6 Indicator pilot lights Detergent dispenser drawer Programme selector dial SPIN reduction button PREWASH and QUICK options button Quick Programme Selector Dial This option can be used for lightly soiled laundry. The washing time will be reduced according to type of fabric and the selected temperature. It allows you to switch the appliance on/off and/or to select a programme.
The light End illuminates at the end of the washing cycle. First use • Ensure that the electrical and water connections comply with the installation instructions. • Remove the polystyrene block and any material from the drum. • Pour 2 litres of water into the main wash compartment of the detergent drawer in order to activate the ECO valve. Then run a cotton cycle at the highest temperature without any laundry in the machine, to remove any manufacturing residue from the drum and tub.
Measure out the detergent Select the required programme by turning the programme selector dial Measure out the detergent and the fabric softener Pull out the dispenser drawer until it stops. Measure out the amount of detergent required, pour it into the main wash compartment or in the appropriate compartment if it is required by the selected programme or option (see more details in «Detergent dispenser drawer» ). Turn the programme selector dial to the required programme.
Select the spin speed or Rinse Hold option by pressing button 3 The relevant light will light up. For the compatibility among the washing programmes and the options see chapter «Washing Programmes». Start the programme by pressing button 5 To start the selected programme, press the button 5 , the corresponding green pilot light stops blinking. The pilot light Wash and Door lock illuminate. The appliance starts operating and the door is locked.
After closing the door, it is necessary to select the programme and options again and to press button 5 . Before you make any change, you must PAUSE the appliance by pressing the button 5. Changing a running programme is possible only by resetting it. Turn the programme selector dial to Off and then to the new programme position. Start the new programme by pressing the button 5 again. The washing water in the tub will be not emptied out. At the end of the programme The machine stops automatically.
Helpful hints and tips Oil based paint: moisten with benzine stain remover, lay the garment on a soft cloth and dab the stain; treat several times. Dried grease stains: moisten with turpentine, lay the garment on a soft surface and dab the stain with your fingertips and a cotton cloth. Rust: oxalic acid dissolved in hot water or a rust removing product used cold. Be careful with rust stains which are not recent since the cellulose structure will already have been damaged and the fabric tends to hole.
Although biodegradable, detergents contain substances which, in large quantities, can upset the delicate balance of nature. The choice of detergent will depend on the type of fabric (delicates, woollens, cottons, etc.), the colour, washing temperature and degree of soiling.
Washing Programmes Programme - Maximum and Minimum Temperature - Cycle Description - Maximum Spin Speed - Maximum Fabrics Load - Type of Laundry Options Detergent Compartment COTTONS 90° - 60° Main wash - Rinses Maximum spin speed at 1200 rpm Max. load 5,5 kg - Reduced load 2,5 kg White cotton (heavily or normally soiled items). SPIN REDUCTION RINSE HOLD PREWASH QUICK 1) 2) COTTONS ECO 60° Main wash - Rinses Maximum spin speed at 1200 rpm Max.
Programme - Maximum and Minimum Temperature - Cycle Description - Maximum Spin Speed - Maximum Fabrics Load - Type of Laundry Options WOOL 40°- 30° Main wash - Rinses Maximum spin speed at 600 rpm Max. load 2 kg Washing programme for machine washable wool as well as for hand washable woollens and delicate fabrics. Note : A single or bulky item may cause imbalance. If the appliance doesn’t perform the final spin phase, add more items, redistribute the load manually and then select the spinning programme.
Technical data Dimensions Width Height Depth Depth (Overall dimensions) 60 cm 85 cm 60 cm 63 cm Electrical connection Voltage - Overall power - Fuse Information on the electrical connection is given on the rating plate, on the inner edge of the appliance door.
Care and cleaning Cleaning the dispenser drawer Warning! You must DISCONNECT the appliance from the electricity supply, before you can carry out any cleaning or maintenance work. The washing powder and additive dispenser drawer should be cleaned regularly. Remove the drawer by pressing the catch downwards and by pulling it out. Flush it out under a tap, to remove any traces of accumulated powder. Descaling The water we use normally contains lime.
• the machine makes an unusual noise during draining due to objects such as safety pins, coins etc. blocking the pump. Proceed as follows: • disconnect the appliance; • if necessary wait until the water has cooled down. • Open the pump door. Cleaning the drawer recess Having removed the drawer, use a small brush to clean the recess, ensuring that all washing powder residue is removed from the upper and lower part of the recess. • Place a container close to the pump to collect any spillage.
• Remove any objects from the pump impeller by rotating it. Cleaning the water inlet filters Warning! If the appliance doesn't fill or it is taking longer to fill with water, check if the water inlet filters are blocked. 1. Turn off the water tap. 2. Unscrew the water inlet hose. 3. Clean the filter using a hard bristle brush. • Put the cap back on the emergency emptying hose and place it back in its seat. 4. Screw the hose back onto the tap. 5. Unscrew the hose from the machine.
Frost precaution Important! Every time you drain the water through the emergency emptying hose you must pour 2 litres of water into the main wash compartment of the detergent drawer and then run the drain programme. This will avoid wasting detergent on the next wash programme. If the machine is exposed to temperatures below 0°C, certain precautions should be taken. • Turn off the water tap. • Unscrew the inlet hose.
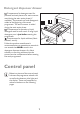
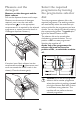
Installation Unpacking All transit bolts and packing must be removed before using the appliance. You are advised to keep all transit devices so that they can be refitted if the machine ever has to be transported again. 1. After removing all the packaging, carefully lay machine on it’s back to remove the polystyrene base from the bottom. 3. Unscrew the three bolts. 2. Remove the power supply cable and the draining and inlet hose from the hose holders on the rear of the appliance. 4.
Warning! The machine should NOT be placed on deep pile carpeting. Level the washing machine by raising or lowering the feet. The feet may be tight to adjust as they incorporate a self locking nut, but the machine MUST be level and stable. If necessary, check the setting with a spirit level. Any necessary adjustment can be made with a spanner. Accurate levelling prevents vibration, noise and displacement of the machine during operation. 6.
Water inlet Warning! This appliance must be connected to a cold water supply. The inlet hose is screwed to the back of the appliance. 1. Set the hose correctly by loosening the ring nut. After positioning the inlet hose, be sure to tighten the ring nut again to prevent leaks. Always use the hose supplied with the appliance. The inlet hose must not be lengthened. If it is too short and you do not wish to move the tap, you will have to purchase a new, longer hose specially designed for this type of use.
local Service Force Centre. The joining piece must have an internal diameter of 18 mm. If your drain hose looks like this (see below) you do not require the “U” piece”. Just push the hose firmly in to the standpipe. Firstly form a hook in the end of the drain hose using the “U” piece” supplied. 1 Place the drain hose into your standpipe, which should have an internal diameter of approximately 38 mm thus ensuring there is an air break between the drain hose and standpipe. 30 cm (12”) 2.
or displacement. The base should protrude a few centimetres beyond the edges of the appliance. Warning! The appliance should NOT be placed on deep pile carpeting. Note! Please ensure that when the appliance is installed it is easily accessible for the engineer in the event of a breakdown. In the interest of the environment The appliance should be connected to the FOUL drainage system, the water will then be taken to a sewage works for treatment before being discharged safely into a river.
SHOWER SINK TOILET BATH BIDET WASHING MACHINE DISHWASHER RAINWATER ‘RUN-OFF’ FOUL DRAIN SURFACE WATER DRAINS & SEWERS FOUL SEWERS SEWAGE TREATMENT WORKS UNTREATED DISCHARGE TREATED DISCHRGE RIVER RIVER Electrical connection Warning! THIS APPLIANCE MUST BE EARTHED. The manufacturer declines any liability should this safety measure not be observed. Before switching on, make sure the electricity supply voltage is the same as that indicated on the appliance’s rating plate.
The wire coloured blue must be connected to the terminal «N» or coloured black. The wire coloured brown must be connected to the terminal marked «L» or coloured red. Upon completion there must be no cut, or stray strands of wire present and the cord clamp must be secure over the outer sheath. Important! Information on the electrical connection is given on the rating plate on the inner edge of the appliance door. The appliance is supplied with a 13 amp plug fitted.
Once the problem has been eliminated, press the button 5 to restart the programme. If after all checks, the problem persists, contact your local Service Centre. Important! if you call out an engineer to a fault listed below, or to repair a fault caused by incorrect use or installation, a charge will be made even if the appliance is under guarantee. During machine operation it is possible that the red pilot light of button 5 blinks to indicate that the machine is not working.
Problem Possible cause/Solution The machine fills than empties out immediately: The end of drain hose is too low. The end of drain hose is submerged in water. There is no vent in the end of drain hose. • Refer to relevant paragraph in "Water drainage" section. Too much detergent or unsuitable detergent (creates too much foam) has been used. • Reduce the detergent quantity or use another one. Check whether there are any leaks from one of the inlet hose fittings.
Problem Possible cause/Solution Spinning starts late or the machine does not spin: The electronic unbalance detection device has cut in because the laundry is not evenly distributed in the drum. The laundry is redistributed by reverse rotation of the drum. This may happen several times before the unbalance disappears and normal spinning can resume. If, after 10 minutes, the laundry is still not evenly distributed in the drum, the machine will not spin.
So that you always have these numbers at hand, we recommend you to make a note of them here: • Mod....................................... Spare parts Always insist on genuine spare parts. An authorised service engineer should service this product, and only genuine spare parts should be used. Under no circumstances should you attempt to repair the machine yourself. Repairs carried out by inexperienced persons may cause injury or serious malfunctioning. Contact your local John Lewis Branch. • P.N.C.........
• Measure out detergent according to the water hardness, the degree of soiling and the quantity of laundry being washed.
John Lewis Partnership 171 Victoria Street London SW1E 5NN www. johnlewis.