Owner’s Manual
������ � ����� ����� � � �� �� ������������� ��� � ����� � �� �� �� �� �� � ���� �� � � � �� �� ������� 2
GB Content General remarks 4 1. First use 6 2. How SPECTATOR functions 9 1.1. Introduction 1.2. Safety instructions 1.3. Scope of delivery 1.4. Charging the battery 1.5. Switching on / off 6 6 7 7 8 2.1. Product Function Diagram 2.2. OPERATION 9 10 3. Connect to the PC 20 4. Warranty and Service 24 3.1. Minimum systems requirements 3.2. Driver Windows 98/ME/XP/VISTA, Linux 2.4.x, MacOS 10.2.x 3.3. Log off SPECTATOR under Windows 3.4. SPECTATOR format for hard disks 3.6 Connect to PC 4.1.
General remarks 1. Liability The manufacturer only guarantees suitability for the original purpose of this product. Furthermore the manufacturer cannot be held responsible for the damage of data. This also includes the loss of data as well as any consequential damage resulting from the use of this product. The manufacturer reserves the right to further develop the product continuously. Any such changes can be made without being directly described in this manual.
GB - - because otherwise the danger of electrical shocks, of fire or of short circuits will increase. Do not place the drive next to other electrical devices like television sets, radios or loudspeakers as this may impair the functioning of these other devices. Do not place the drive next to sources of magnetic interferences like computer screens, television sets or loudspeakers. Magnetic interferences may impair the operation and the stability of the drive.
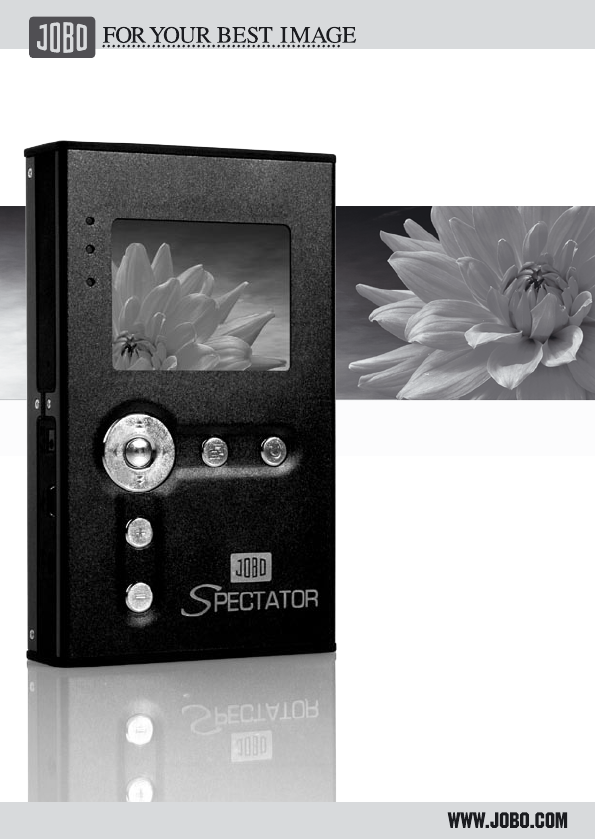
1. First use 1.1. Introduction Many thanks for choosing the JOBO SPECTATOR. The SPECTATOR is the perfect solution if you want more than just storing your data! With the new SPECTATOR you can already view your pictures in superb quality while you are still traveling, no matter where you are – and you can do so without a PC! On the large 2.5“ high brilliance TFT color LCD you can look at your most beautiful photos in breathtaking quality and you can even zoom in and out.
GB 1.3. Scope of delivery The package contains the following parts: - JOBO SPECTATOR - integrated battery - integrated hard disk - mains adapter - driver CD including software - USB cable - video cable - manual 1.4. Charging the battery The device has an integrated Li-Ion battery with 2000 mAh. Please, charge the battery once completely for 12 hours before the first use by way of the mains adapter supplied with SPECTATOR. Only use the original mains adapter that comes with the device for charging.
1.5. Switching on / off 1.5.1. Switching on SPECTATOR On the right-hand side there is the „ON / OFF” sliding switch by which to switch on SPECTATOR. In order to avoid switching on the device by mistake the switch needs to be held in the “ON” position for 2 seconds to activate the device. Make sure that the battery is sufficiently charged. 1.5.2. Switching off SPECTATOR In order to switch off the device you again operate the “ON / OFF” sliding switch on the right-hand side for about 2 seconds.
GB 2. How SPECTATOR functions 2.1. Product Function Diagram In order to familiarize you with SPECTATOR all keys and their functions are explained in the following diagram: 1. 2. 3. 4. 5. 6. 7. 8. 9. 10. 11. 12. 13. 14. 15. 16. 17. 18. 19.
2.2. OPERATION 2.2.1. COPYING FILES to Hard Disk After power on, the start up screen will give you three modes to choose from. The device is also immediately in standby mode to copy files from memory cards to internal Hard Disk. If you insert a card then press the file will be copied to Hard Disk automatically. The card type is detected as well. During the copying process the data is automatically verified.
GB Important: Under no circumstances should you remove the memory card during the copying process. This may lead to the complete freezing of the SPECTATOR which can only be released by a Reset. For a copying process involving a large data volume it is recommended to check the battery capacity by observing the battery symbol on the display. If the capacity is low you should first recharge the battery or connect the mains adaptor to the device during copying.
2.2.2.2. Functions of buttons in FILE mode In the FILE mode the buttons have the following functions: a.) down to next folder in folder structure b.) pan after zoom to right side a.) up to previous folder in folder structure b.) pan after zoom to left side a.) Select a file or folder in folder structure b.) confirm to display an image c.) confirm “copy, paste or delete” d.) zoom back to full screen size, when image is displayed a.) moving up in folder structure b.) pan after zoom to the top a.
GB The red highlighted button for example “copy” can be confirmed by pressing the button. After doing so the menu disappears, this is also the confirmation that the process has worked. If you choose the “delete” button, there is a security step added. Once you confirmed “delete” with the button an extra window appears asking if you really want to delete the file.
Press: to finally delete the file or folder to go back to previous menu. 2.2.3. IMAGE MODE The image mode gives you all the possibilities to view your images: You can preview the images, there is a thumbnail view, slideshow mode, zoom function and you can use the “TV out” to present your pictures on TV. In the IMAGE mode all files except images are hidden. 2.2.3.1 Select IMAGE mode On the start up screen, you can use the buttons or to select one of the three modes; FILE, IMAGE or SYSTEM mode.
GB 2.2.3.2 Functions of buttons in IMAGE mode In the IMAGE mode the buttons have the following functions: a.) next picture b.) down to next folder in folder structure c.) pan after zoom to right side a.) previous picture b.) up to previous folder in folder structure c.) pan after zoom to left side a.) Select a file or folder in folder structure b.) confirm to display an image c.) zoom back to full screen size when image is displayed a.) moving up in folder structure b.) pan after zoom to the top a.
2.2.3.4 Thumbnail view / Slideshow mode When you have selected a folder, press button for thumbnail view. Then 8 pictures are displayed on the screen. You can move through the whole folder by using the buttons: , , and . To start the slideshow press button again and the slideshow will start automatically. The pictures change automatically as well. To get back to the “Thumbnail view” just press again button. 2.2.4.
GB 2.2.4.1 Select SYSTEM mode On the start up screen you can use the buttons or to select one of the three modes; FILE, IMAGE or SYSTEM mode. To confirm press the button. The selected mode is highlighted in red. 2.2.4.2 Functions of buttons in SYSTEM mode In the SYSTEM mode the buttons have the following functions: and change options and selecting functions takes you back to main menu 2.2.4.
You have the following options to adjust: 1. a. b. c. d. e. f. g. Language of the on-screen menu English German French Spanish Dutch Swedish Italian 2. Brightness Range from 5 to 55 3. Contrast Range from 5 to 55 4. TV You can choose between: S-PAL C-Pal C-NTSC S-NTSC 5. LCD Off This is a power saving function you, can choose to turn off the display after 5sec, 15sec, 30sec or never. 6. Update You can update the firmware if there is a new release with new functions.
GB 2.2.5. SPECTATOR as external HDD or USB card reader Connect the SPECTATOR to your computer with the USB cable. Then you can select that the device will be identified as an HDD or CARD REARDER. Press button to confirm your choice. After confirming your choice the device will power off automatically and the screen will turn black Your computer will now automatically recognize the connected device. The hard disk of the SPECTATOR will now be available to you as a new letter code drive.
3. Connect to the PC 3.1. Minimum systems requirements - Microsoft Windows TM 98/ Me/ 2000/ XP, MacOS 10.2 or higher, Linux 2.4.x or higher - CD-ROM drive - Pentium2, 400 MHz - RAM 32MB (Windows ME, 2000) – 64MB (Windows XP) - 20MB hard disk memory - USB interface 3.2. Driver Windows 98/ME/XP/VISTA, Linux 2.4.x, MacOS 10.2.x For these operating systems no drivers are required. Please, make sure that you have installed the most recent Service Packs of the operating systems in question. 3.3.
GB For the formatting on MAC you do not need any additional program. The hard disk must be formatted in the MS-Dos mode. 3.4.1 Installing Swissknife Install the „Swissknife“ program on a computer with a Windows operating system (WIN 2000, ME, XP). The installation is either automatic or after inserting the CD you can activate the program with > Start / Execute / Jobo / Swissknife / and a double click on „Swissknife.exe“. All the installation queries can be confirmed.
All data on the hard disk is now deleted and you can proceed to re-format. Important settings for the re-formatting process: The File System must be adjusted to FAT 32 > 2 Under Volume label enter the name SPECTATOR and this drive description will then also appear in the connection with the computer in the drive structure > 1 Click on Create > 3 This completes the re-formatting of the SPECTATOR. Under Partition the system will show the available storage space under the drive name (Volume label) SPECTATOR.
GB 3.6 Connect to PC If there are any problems in the USB connection to the PC or MAC these can be removed by connecting a USB HUB between the SPECTATOR and the computer.
4. Warranty and Service 4.1. Warranty conditions This product is subject to the legal warranty periods relating to manufacturing faults and defects. Substance of the warranty: 1. In the event of malfunctioning caused by manufacturing defects JOBO AG will repair or replace the defective product at its own discretion. 2. JOBO AG and its suppliers do not assume any liability for data losses occurring during operation of the device or consequential damage resulting from this.
GB If you want to make any claims under the warranty you are asked to contact the Technical Service of JOBO AG. You will be expected to quote the serial number of the JOBO product and may also have to submit proof of purchase to show that the warranty period has not yet elapsed. 4.2. Contact/Service If you have any questions on or need help with our products please do not hesitate to get in touch with our Technical Service.
- When you use the hard disk please make sure to operate the file correctly. If you lose any file because of wrong operation we will not assume any responsibility. - Regarding your personal data stored in the machine we suggest that you copy it to your PC in time - Hard disk partition should be at most 3, because you may not see the files stored outside the third partition in the machine; yet when connected to the PC the files will display in the PC 4.4.
GB 27
JOBO AG • 51645 Gummersbach • Kölner Straße 58 • Tel: 02261 / 545-0 • Fax: 02261 / 545-46 • Mail: info@jobo.com • www.jobo.