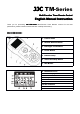
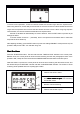
JJC TM-Series Multi-Function Timer Remote Control English Manual Instruction Thank you for purchasing JJC TM series Multi-Function Timer Remote control.. For the best performance, please read this manual instruction carefully before using. Parts of TM controller: 1. Control Panel 2. Shutter Release Button 3. LED Light / Lock Button 4. Arrow Button 5. Release Lamp 6. Timer Start/Stop Button 7. SET Button 8. Selection cursor 9. Timer Display 10. LOCK indicator 11. Low power indicator 12.
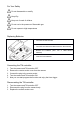
For Your Safety Do not disassemble or modify Keep Dry Keep out of reach of children Do not use in the presence of flammable gas Do not expose to high temperatures Replacing Batteries: 1. Turn OFF the TM controller 2. Turn OFF the Camera and Disconnect the TM controller 3. Remove the batteries (AAA 1.5V or LR03 Alkaline batteries) 4. Insert two fresh batteries Connecting the TM controller: 1. 2. 3. 4. 5.
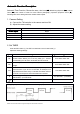
Automatic Function Description: DE BU Automatic Timer Function, Choose the Delay / Self Timer (DE DE), BULB/Long Exposure (BU BU), Interval INT N)). Timer (INT INT) and number of shots for timed interval photography exposure (Exposure Count (N Following table is the setting about the camera shutter speed. 1. Camera Setting a) Connect the TM controller to the camera and turn ON.
Setting the Timer � � Use the arrow button to set the timer. Press left or right to select, up or down to change. The current selection is indicated by the selection cursor. Press the SET button at any time to complete the operation and display the new setting for the selected item. To view other setting, press the ARROW button left or right. The current selection is indicated by the selection cursor. Press the SET button to edit the current setting as described above. 1.
.Speaker To ensure correct operation, choose an interval at least two seconds longer than the exposure time. When using autofocus, set the delay to two seconds or more and choose an interval at least two seconds longer than the exposure time to ensure that the camera has time to focus. When using long exposure noise reduction, the interval should be at least twice the exposure time. Intervals of 00:00:00 will automatically be reset to 00:00:01 when the SET button is pressed to put settings into effect.
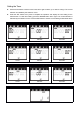
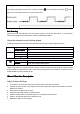
The Speaker and Release Lamp The following illustration shows when a beep will sound ( ) and the release lamp flash ( ) with a delay of 5s, and exposure time of 4, and an interval of 9s. End Shooting Shooting will end automatically when the selected number of shots has been taken. To end shooting before all photographs have been taken, press the START/STOP button.
LED Light / Lock Button Press the LED Light / Lock Button for 1 second to turn on the LED lamp of the control panel. Press the LED Light / Lock Button for 2 seconds to enable the Button Lock.