User Manual GP11 CREATING SECURITY SOLUTION
Specifications 32 wireless zones and 2 wired zones Periodic supervision for wireless PIR and magnetic switch App(available in Google play and Apple store) control Window/door open remind User account / zone naming GSM/SMS alarm selectable Built-in rear tampers for control panel 200 event logs with time indication Built-in siren (85dB), compatible with wired external siren and 3 wireless sirens Alarm linkage output: PGM x1 AUX power output x1 4 for private phones Numbers(or mobiles) 8codes: 1 for installer,
User Account / Zone Naming Each Wireless Zone / Code can be given a 16 character name. Names can be given either when first adding a Zone / Code or by editing them later. All names can be deleted only in “Initialize All”. The name will be show in event log or SMS. APP Control After install the APP software, users can use smart phone to control some function of panel, like: Arm, disarm, bypass, turn on / turn off siren etc. each processing in APP, mobile phone will send one charge SMS to control panel.
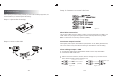
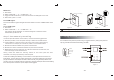
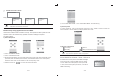
Step 3: Connect external devices 1: Easy Install CONTENTS After unpacking the kit and making sure that you have all the necessary equipments, it is recommended that you install the system as following: Step 1: Open the housing Figure -3- Figure -1- Wired Siren Connection The max drive of BELL terminal is 400mA / 12VDC. Connect the bell power line to “BELL” and “GND”. Users can try to program via keypad to set if the siren beeps and how long it beeps.
Setting PGM trigged by programming setting, when meet trigged condition, PGM connected, see pages related to PGM Note PGM only compatible with low voltage (DC) control board. It shall not be connected with city power (AC) directly. The system will keep the time and date with time chip powered. If the power of time chip runs out, users need to re-set the time manually. The icon will move to next automatically after each input. Press “ * ” to exit. After complete input, press “#” to confirm.
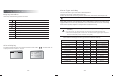
Walk Test: 1. Enter Menu. 2. Select “8.Aided Test” ĺ “ # ” ĺ “2.Walk Test”ĺ “ # ”. 3. Trigger the desired devices, and the info about them will disappear on the LCD. 4. After all test, press “ ” to exit. InstallingGHoleGDrawing Test GSM signal: The communication signal strength should be tested to confirm if GSM module work well. Wall To test GSM signal: Wall Figure -6- 1. Enter Menu. 2 Select “8.Aided Test” ĺ “ # ” ĺ “4.GSM Test”ĺ “ # ”. 0-31 means for the signal strength. 31 means the strongest.
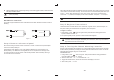
If under arm stay, press “ Front Panel Keypad For arm away (3) Disarm Press “ For arm stay For disarm, and also for fire alarm(press for 2s) For programming, and also for panic alarm(press for 2s) Figure or navigation key for up turn, for menu operation or query Figure or navigation key for down turn, for menu operation or query It means ಯdeleteರ while inputting figures or quit for menu operation ” on keypad or keyfob, the voice will guide “Enter password, / add 0 to delete the event log ” .
Press ಯ ರ on keypad or ಯ ರ on keyfob for s. SMS Operation Trigger fire alarm: Press ಯ Users can proceed arm-away/arm-stay/disarm/status enquiry operation by sending SMS to control panel.
Arm/disarm status check: password0808status Reply format: ID: 1234 STAT: Arm away Act:OK ID: 1234 STAT: Arm stay Act:OK ID: 1234 STAT: Disarm Act:OK Ļ Click “ SAVE SETTINGS ”. Click “ SAVE SETTINGS ” to finish setting. Arm & disarm is not allowed when programming; when zone alarm, it will not arm, Note meanwhile it will fail and return back. 2) Choose profile In control panel list, click control panel's name, then click “ Select ” button to enter the main interface.
Alarm Type and Way 3: Using System –More Details There are two alarm type: instant alarm and delay alarm. Trigger 24-hour zones, instant alarm will occur. 24-hour zones include: fire zone, gas zone, panic zone, duress zone, and tamper zone. Display Interface Users may meet following symbols or marks: ¥ Note : For 24-hour zone, whether it is armed or disarmed, once triggered, it will alarm immediately.
Keypad Lock and Unlock If the code is input wrong, the voice will guide “ Wrong password, please re-input! ” And if the code is input wrong for 5 times,the voice will indicate “Access locked, please try later! ”DŽ After the code is locked, and operate any step which requires code, the voice will guide “ Access locked, please try later! ” If the code is locked when there is no alarm, but alarm occurs after the code lock, the system will auto release the code lock.
4: Menu System in Detail Default installer code: 1234 Enter Programming Default master code: 0808 To configure the system, or make any changes to the pre-set functions. During disarm, press “ ” on keypad, Input master code or installer code to enter main menu. Press the “ / ” to select what users desire to set and confirm with “ # ”. or Press . “ ” to exit. Quit Programming Press “ ” to quit programming to previous menu. Or it will return to previous automatically with no operation within 1 minute.
3. Input the new code, Press “#” to confirm. With no code input, press “#” to delete it . 4. The LCD will remind if it is edited or not. Press any key to exit. 5. The LCD will remind if need change the name. Press “#” to confirm. Or “ ” to quit. 1. Select the phone group number, press “ # ”to enter. 2. Select parameters users desire to set ending with “ # ”. 3. Select “ ON ” or “ OFF ”. Duress Code Panel ID While users disarm with duress code, it will indicate “Disarm” on site but will send alarm info.
2. Trigger the wireless asap to avoid any interference. Exit Delay 3. The system will remind to save after receiving the signal. Press “ # ” to save, or “ * ” to re-register. A period for user to leave detecting area once the system armed. Zones with exit delay will not Note During register, if the signal is received for registered code, it will indicate as registered. If the code is in wrong format, it will indicate as wrong. If no code is received within 60s, the system indicate “Enrolling failed!”.
Same as wireless zones, pls refer to that. PGM Trigger Zone 1 Alarm Wireless Siren Register Same as wireless zones, pls refer to that. Activated by…… Disactivated…… Instant Trigger Disarm or PGM cut-off Zone 2 Alarm See above See above …… …… …… Zone 15 Alarm See above See above Clear Wireless Siren Zone 16 Alarm See above See above Same as wireless zones, pls refer to that.
RFID Register Volume Same as wireless zones, pls refer to that. It enables users to activate or mute the speaker and meanwhile adjust the volume. Clear RFID Supplementary Entry Delay Same as wireless zones, pls refer to that. The Supplementary Entry Delay is a pre-alarm feature that is employed in the event that the system is not disarmed during the entry delay. And the period is set as 5s. While this function is 6. Event Log turned off, the system will alarm immediately after entry delay.
2. Once the correspondent signal is transmit, the detector display will disappear on LCD. If it will not disappear, it indicates trouble occurs. 3. When all detectors disappear out of LCD, the voice will guide “Walk test over!” meanwhile with “No device!” indicating on LCD. 4. Press “ * ” to quit when test is finished. 5: Troubleshooting “T” will display on LCD if there is. Users can press “ “ ” or “ ” to enter the trouble list, and then press ” to check.
6: Parameters 7: Appendix Warranty and Limitations General Parameters: Wireless zones : 32 Wired zones : 2 EOL resistance: 2K~2.4K Although it is an advanced and reliable security system, it does not offer absolute Wireless frequency : 433MHz / 868MHz Detector / Magnetic contact / Keyfob wireless distance: ı100m (with no obstacle) 1. Intruders may get access to unprotected openings or have technical sophistication to invalidate the system. Siren wireless distance: ı50m (with no obstacle) 2.
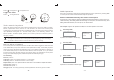
Menu Structure Ter m Definitions Detector: A facility that detects intrusion and abnormal state automatically via some electric or physical methods and output switch signals or wireless signals to the system for disposal, then output signals, such as infrared detector, smoke detector, etc. Available with installer code Available with master code Zone: An area of the detection range of one or group of detectors. Bypass: Close one of the zones temporarily, so that it cannot alarm while act in the zone.
Warning˖ This device complies with Part 15 of the FCC Rules. Operation is subject to the following two conditions: (1) this device may not cause harmful interference, and (2) this device must accept any interference received, including interference that may cause undesired operation. changes or modifications not expressly approved by the party responsible for compliance could void the user's authority to operate the equipment.