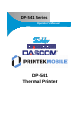
DP‐5 541 Series Operator’ss Manu ual DP-5 D 541 Therm mal Prin nterr
FCC Part 15 Class B This device complies with Part 15 of the FCC Rules. Operation is subject to the following two conditions: (1) this device may not cause harmful interference, and (2) this device must accept any interference received, including interference that may cause undesired operation. This equipment has been tested and found to comply with the limits for a Class B digital device, pursuant to Part 15 of the FCC rules.
This device co omplies with In ndustry Canada a license‐exemp pt RSS standard d(s). Operation n is subject to tthe following tw wo conditions: 1) this device m may not cause in nterference; 2) this device mu ust accept any interference, i in ncluding t may cause e undesired ope eration of the device.
product unsafe to operate. The print head and motors get hot during use. Wait until they cool before touching them. Make certain the printer is disconnected from AC power before removing any covers or performing any required cleaning or maintenance. Connecting this printer to an ungrounded receptacle can result in electrical shock. Never place the printer near inflammable or explosive substances. Do not operate near liquid or spill liquid into the printer at any time.
TABLE OF CONTENTS Introduction ......................................................................................................................................................... 2 Printer Features .................................................................................................................................................. 3 Quick Start Instructions .....................................................................................................................................
Introduction Thank you for purchasing the Dascom DP-541 Series mobile thermal printer also referred to in this manual as the “DP-541”. The DP-541 series prints on special thermal media supplied in roll form up to 4.1 inches wide. All models are equipped with a USB port which supports cabled communications. All models support an optional internal Wi-Fi interface. Complete specifications may be found in Appendix A – DP-541Printer Specifications.
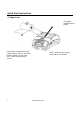
Printer Features USB Data Port Power Port Control Panel Button Door Door Release Paper Compartment Your DP-541features: Easy-to-read control face and simple drop-in paper loading Quickly prints a wide variety of tickets, and receipts. IP54 rated for water and dust resistance...
Quick Start Instructions A. Paper Load Tear paper towards back of printer Press Paper Compartment Door release button to open. Pull small leader of paper out and close door; “clicks” when properly closed. 4 NOTE: When using 3” paper, install spacer P/N: 93194 www.dascom.
B. Battery Installation Loosen hand strap (not pictured) to access battery door. Press button to see Battery charge level. 4 LED 100% charge 3 LED 75% 2 LED 50% 1 LED 25% Rotate knob 1800 to unlock battery door. Drop in battery. Use Bay Chargers or AC/DC Power Adapter to charge. Close battery door and rotate knob 1800 to lock. Please contact your Printek Sales representative for price and availability. C.
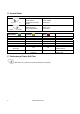
E. Control Panel Control Panel Power Button Paper Feed Button Power & Status (Green/Red) On On On Flashing Flashing Flashing Solid, Flashes Off Every 2 Seconds Power Up Power Down Toggle IP over USB on/off Press & Release Press & Hold Press twice Advance paper Print Setup Report Press once Press twice Battery (Yellow) Alert (Red) Indication Off Off Off Off Off Off On Off Flashing Off Off Flashing Off Off Solid Flashing F.
Configuration Configuration of the DP-541 printer is done through a built-in web page. This allows you to configure the printer from any device that has a browser and is compatible with your DP-541 communication capabilities. 1. Turn the printer ON. 2. Connect a USB cable between the printer and a PC. 3. To access the DP-541 web page, push the Power button twice rapidly. This will put the printer into Configuration mode. 4.
5. The main configuration screen of the DP-541: This is an overview of the printer configuration. The battery icon shows the relative charge in the battery. The more bars, the higher the charge. An AC plug will appear in the battery icon when the printer is plugged into an external power source. To return the printer to normal operating mode, double-click the Power button. The POWER LED will be returned to a solid light. At the top of the Main Page are selections to access the sub-menus.
WI-FI Config: Wireless Configuration This will display the current Wi-Fi configuration: IP Address – user defined. If Static Address Method is selected, type in the address the printer will use on the network. SubNetMask – user defined. If Static Address Method is selected, type in the subnet mark of the network. GateWay – user defined. If Static Address Method is selected, type in the gateway address of the network. WiFi Port – user defined. Type in the IP port to be used by the printer.
Available Networks – access points detected by the printer will be displayed. Select Add/Connect to use one of these access points. Previously Connected Networks – access points detected by the printer or added through Add/Edit Network will be displayed. Select Connect to use one of these access points, or Remove to delete it from printer. Currently Configured Networks – access points added through Add/Edit. They may not have been connected yet. Select Remove to delete access point from printer.
These are Enterprise network settings. Consult your server manual for recommended settings. Upload Digital Certificate If your enterprise network uses digital certificates as another form of authentication, you can upload the certificates here. B. Image Parameters This page allows you to make selections about the image to be printed. Current Emulation: Possible Values: ZPL, CPCL, ESCPOS, IPL, AUTOIMAGE, PDF, POSTSCRIPT, IMAGE 11 www.dascom.
The DP-541 printer is capable of using several different emulation modes. This feature sets the family of printer commands that may be used by a host application program to control the various capabilities of the printer. The printer will only respond to commands valid for the currently selected emulation. For more information, please refer to the Integrator’s Guide.
Login Password This allows the printer webpage password to be changed. Units Select between inches or millimeters. If you change units, do so before entering other settings. Max Paper Speed Possible values: 1.0 to 5.0 ips, Default = 5.0 When using labels or heavy paper stock, you may need to decrease the paper speed to prevent paper jams. Mark Seeking Possible values: Off*, Front, Rear, Gap. (Note: Rear and Gap are available only on 541L models).
When using paper with a black on the front adjust this setting to insure the paper stops at the black mark. 1. With the lid closed and the black mark not over the front paper sensor, note the Sensor Brightness. 2. Open the paper lid and hold the paper against the front paper sensor so that the black mark is over the sensor. Note the Sensor Brightness. 3. Set Threshold = black mark brightness + ((paper brightness – black mark brightness) / 2) and click Submit Changes.
Upload Font File Truetype Fonts (.ttf, .otf, .ttc and .bdf) can be uploaded here. Languages like ZPL and CPCL can use the fonts by referring to them by their Font Family Name. Font Aliases Languages like ZPL and CPCL can use an uploaded Font Alias Table so legacy jobs can have their font names mapped to other uploaded fonts. Contact Dascom retailer for more information. E. Graphics This menu will allow you to load a graphics file into printer memory for use in creating your output.
Upload File Select the graphics file to load into printer memory. Acceptable graphics formats are .jpeg, .pbm, .pcx, .bmp, .png and .svg. Set Width Select the width you want to use to display your logo: full width, half width, or quarter width.
Printer Application Updates, OEM information and Manuals and more can be uploaded here. Contact Dascom retailer for more information. G. Reset Printer Configuration to Factory Defaults (Safe Mode) Printer settings can be restored to factory configurations. Note that WIFI network configurations will be lost when Network Config to Factory Defaults is checked. 17 www.dascom.
Printing Modes There are two fundamental printing modes with mobile printers. A. ASCII Based Print Jobs The host sends the print job as a series of lines of characters, some of which represent the text to be printed, while other portions are command codes which tell the printer which font to use, where to locate the text, what barcodes to use, etc. These text-based files are encoded in a print language specific to the target printer.
Integrating the Printer into your Business Applications Step by Step – Creating a Link from Host to Printer A. Windows Desktop Computers Print Drivers You may download the appropriate Windows driver from our website. Install the printer driver by the standard method for your version of Windows. I. USB a) Install the printer driver onto your hostbefore connecting the printer. Follow prompts displayed during installation. b) Plug the printer into a USB port on your host system using a mini-USB cable.
k) Windows defaults standard TCP/IP ports to port number 9100. The DP-541 Wi-Fi port number is internally set to 8023. Change the port number to 8023 in the Windows screen and click OK. l) Click “Apply” in the Printer Properties box. m) Your DP-541 printer driver should now be properly coupled to the Wi-Fi parameters you have chosen. B. Windows Tablets and Smartphones This feature and/or specific directions for use were not available as of this printing. C. Android Tablets & Smart phones I.
Media A. Standard Media Dascom offers a variety of media types. See Appendix C for detailed descriptions and ordering information. You may also visit our website or contact your Dascom Mobile sales representative for a complete and up to date description of our consumables and accessory products. B. Black Mark Media Position For automatic ticket printing, the Black Mark should be positioned as shown in the figure below.
Maintenance and Troubleshooting A. Cleaning In normal environments, the printer should be cleaned after printing a few rolls of paper or if there are voids in the printout. For optimum performance and life, you should clean the Print Head and Platen Roller whenever you load new paper. To clean the printer areas as described below, use a Thermal Head Cleaning Pen and MCR Cleaning Card available from Dascom, or you may use cotton swabs moistened with isopropyl alcohol. Turn the printer off.
e power ada apter may remain r conn nected to th he printer to o keep the b battery fully charged an nd The willl not cause damage to the printer or battery. III. Addittional Batttery and Safety S Info ormation The e DP-541se eries printerrs use an 11 1.25 volt 29 950 mAH Litthium Ion battery. Cautio on: Risk of explosion if battery is i replaced d by incorre ect type. D Dispose of used batteriies according to the instruction i ns. IV.
C. Troubleshooting When encountering problems, the cause may be the printer or may sometimes be due to other problems with your system. Please review the following tables to solve common problems you may encounter with your printer. You may also visit www.dascom.com for additional “FAQ’s” that may assist you. If you are still unable to solve your problem, please contact the company from whom you purchased your printer since they are most familiar with your systems. I.
Problem Possible Cause Print head dirty Poor quality or “old” paper Paper not feeding. Obstruction in paper path, or paper improperly installed Poor quality paper Paper does not advance to black mark reliably. Paper Door not fully closed Dirty Black Mark/Paper Sensor Black Mark density/contrast Paper not feeding reliably or print is compressed vertically Print Garbled. Printer will not print.
APPENDIX A. Appendix A – DP-541Printer Specifications Printing Specifications Printing Method: Direct thermal. Printing Resolution: 203 dpi (8 dots per mm). Printing Speed: Up to 5 ips. Printing Width: Up to 4.1 inches (104 mm). Fonts/Characters/Bar Codes Fonts: Virtually all TrueType fonts, from 6 cpi to 34 cpi depending on emulation chosen, plus scaling. International Characters: All common sets available via UTF-8 encoding. Unicode support.
B. Appendix B – Supplies and Accessories Part # ACCESSORIES 93181 93180 xxxxx 91868 93176 93177 93194 AC Charge & Print Adapter - North America, 100-240VAC 50/60Hz AC Charging Adapter - North America, 100-240VAC 50/60Hz USB Cable, A to C, 6 Ft.
Glossary of Terms 802.11 Wireless networking communication standards created by IEEE. Ad-Hoc A Wi-Fi network consisting of only stations (no access point). Same as Peer-toPeer. authentication The process a Wi-Fi station uses to identify itself to another station. baud rate The rate at which characters are transmitted over a serial interface. This is also often referred to as bits per second. client Any node on a network that requests services from another node (server).
server Any node on a network that provides services to another node (client). SSID Service Set Identifier. An identifier attached to packets on a Wi-Fi network that identify the particular network the packets are intended for. TCP Transmission Control Protocol. A specification that controls the connection between systems on a network. top of form The vertical position where the first line is printed on the paper.
Index 802.
DASCOM REPRESENTATIVES GERMANY DASCOM Europe GmbH Heuweg3 D-89079Ulm Deutschland Tel.:+49(0)731 2075 0 Fax:+49(0)731 2075 100 www.dascom.com UNITED KINGDOM DASCOM GB Ltd Hart House, Priestley Road, Basingstoke,Hampshire RG24 9PU,England Phone:+44(0)1256 355130 Fax:+44(0)1256 481400 www.dascom.com SINGAPORE (ASIA PACIFIC) DASCOM AP Pte Ltd 2 Jurong East Street 21 #05-42, IMM Building Singapore 609601 Phone:+656760 8833 Fax:+656760 1066 www.dascom.
and Troubleshooting