
Installation Guide


Before Using the Range Hood
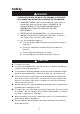
CAUTION: Before proceeding to the installation, check If items
are missing or damaged, contact the manufacturer.
Observe all governing codes and ordinances. Have a qualified
technician install the range hood. It is the installer’s
responsibility to comply with installation clearances specified
on the model/serial rating plate. The manufacturer declines all
responsibility for improper installation and does not accept
responsibility for appliance warranty in the event of damage
caused by incorrect installation.
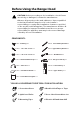
YOU WILL BE NEEDING THESE TOOLS FOR INSTALLATION
1.Protective Gloves
2.Spirit Level Ruler
3.Measuring Tape
4.Double Sided Tape or Tape
5.Cross-Head Screwdriver Set
6.Electric drill and 8mm drill
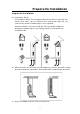
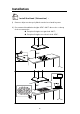
Part 1 : Wall Plug X 9
Part 2 : 0.16"*1.18" Screws X 9
Part 3 : 0.16"*0.32" Screws X 6
Part 4 : Aluminum Exhaust Pipe X 1
Part 5 : Cable Ties X 2
Part 6 : Installation Manual X 1
Part 7 : 1:1 Installation Diagram X 1
Part 11 : Range Hood Body X 1
Part 12 : Lower Chimney X 1
Part 13 : Upper Chimney X 1
Part 9 : Upper Chimney Bracket X 1
Part 10 : Wall Bracket X 1
Part 8 : Lower Chimney Bracket X 1
COMPONENTS:
6