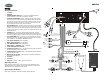
Introduction VM9510 Owner’s Manual 7-INCH DIGITAL TFT 7-INCH BANDTFT AM/FM/DVD/MP3 RECEIVER Congratulations on your purchase of the Jensen VM9510 Mobile Multimedia AM/FM/DVD Receiver. Features OPEN AS/PS DISP VM9510 AV AUX IN Push Push MUTE ENTER MODE PWR • Motorized 7” digital TFT screen • AM/FM stereo tuner • TV tuner w/diversity antenna input • DVD-R/RW, CD-R/RW compatible • Video Select (V Sel.
VM9510 Guide d'Utilisateur Manual del Usuario ¡Gracias! Merci! Gracias por elegir los productos Jensen. Esperamos que encuentre en este manual instrucciones claras y fáciles de seguir. Si se toma unos pocos minutos para leerlo, aprenderá cómo utilizar todas las funciones de su nuevo AM/FM/DVD Multimedia Móvil Jensen VM9510 para su máximo entretenimiento. Merci d'avoir choisi un produit Jensen.
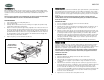
VM9510 Pre-installation 1. Press the metal levers on both sides to remove the half-sleeve from the radio. 2. Remove the trim ring. Connecting the Wiring Adapter (Purchased Separately) Jensen Connector You can make these connections without being in the car. 1 1. Splice or crimp wires. 2. Attach wiring adapter to car wiring harness. 1 2 Preinstalación 7-IN CH DIG ITA L 7-IN TFT CH TFT BAN D AS/ PS VM 951 Push MUT AM /FM 0 /DV D/M E P3 REC 1.
VM9510 Wiring Wiring Connections 4. CONSTANT POWER WIRE (Yellow) – Connect the 12V PLUS constant power wire to a live 12 volt wire in the vehicle. Before making a connection, check that the wire you intend to connect it to is always live, even when the car’s ignition is turned off. If a live wire is not found, route the wire to the car’s fuse block and connect it to a live circuit there. 5. GROUND WIRE (Black) – Securely fasten the Ground wire to a grounded metal part of the car’s chassis.
VM9510 Cableado Câblage Conexiones de Cableado Connexions câblage 1. SINTONIZADOR DE TV 1. TUNER TV ANTENNE 2. ANTENA 2. 3. CABLE DE CONEXIÓN DE ANTENA (azul) - Conectar a una antena motorizada (encendida) y/o a una toma remota de encendido para un amplificador. 3. CABLE ANTENNE PUISSANCE (blue) - Connecté à l'antenne motorisée (câble) et/ou à un fil temps de fermeture pour un amplificateur. 4.
VM9510 Installation Instalación After completing the wiring connections, turn the unit on to confirm operation (ignition switch must be on). If unit does not operate, recheck all wiring until problem is corrected. Once proper operation is achieved, turn off the ignition switch and proceed with final mounting of the chassis. Luego de completar las conexiones del cableado, ajuste el panel delantero y encienda la unidad para confirmar la operación (la ignición debe estar encendida).
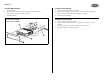
VM9510 Final ISO-DIN Installation Instalación Final ISO-DIN 1. Remove trim ring. 1. Quite el anillo ornamental del frente del radio. 2. Mount factory brackets on new radio using existing screws from old radio. 2. Monte en el nuevo radio los soportes de fábrica usando los tornillos del radio viejo. 3. Slide radio chassis into dash opening and secure. 3. Deslice el chasis del radio en la apertura del tablero y asegúrelo. 4. Reinstall dash panel. 4. Reinstale el panel del tablero.
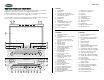
VM9510 Operation/Operación/Opération Controls The buttons located on the radio and the remote controls that perform the same function are assigned the same number for reference on the diagrams and in the text. Los botones ubicados en el radio y en los controles remotos que realizan la misma función poseen el mismo número de referencia en los diagramas y en el texto.
VM9510 Remote Controls Controles Remotos The VM9510 has two remote controls: A fullfeatured hand-held remote control, and a limited feature "Kid Zone" remote control for rear seat passengers. Both remotes use a CR2025 Lithium battery. The battery compartment is located on the back of the remote control near the bottom edge. To replace the battery, pull the compartment out, as indicated on the remote control. 25. 26. 27. 28. 29. 30. 31. 32. 33. 34. 35. 36. 37. 38. 39. 40. 41. 42. 43. 44.
VM9510 Operation (continued) Operación (continúa) NOTE: Some DVDs require specific operation or allow only limited operation during playback which may not respond to all operating commands. When this occurs, the symbol appears on the TFT screen, indicating that the operation is not permitted by the player or the disc. NOTA: Algunos DVD requieren de operación específica o permiten solamente una limitada operación durante la reproducción, la cual puede no responder a todos los comandos.
VM9510 Opération (continuée) A NOTER : Certains DVD exigent une opération spécifique ou permet une opération limitée pendant la reproduction qui peuvent ne pas répondre à toutes les commande d'opérations. Lorsque cela arrive, le symbole apparaît sur l'écran TFT indiquant que l'opération n'est pas permise par la platine ou par le disque. Puissance Appuyez sur le bouton PWR (1) pour mettre l'appareil en marche.
VM9510 Operation (continued) Balance Pantalla TFT Cerrada: Para ajustar el balance, presione y mantenga presionado el CODIFICADOR ROTATIORIO (3) por > 2 segundos hasta que aparece "Sub-W" en el panel LCD. Cuando "Sub-W" esté en pantalla, presione el botón nuevamente 3 veces para acceder al control de balance. Gire el CODIFICADOR ROTATORIO para ajustar el balance entre los altavoces derecho e izquierdo desde R14 (completamente a la derecha) hasta L14 (completamente a la izquierda).
VM9510 Operation (continued) Mute (mudo) Fader Presione el CODIFICADOR ROTATORIO (3) para silenciar el receptor. Presione cualquier botón para reanudar la operación normal. TFT Screen Closed: To adjust the fader, press and hold the ROTARY ENCODER (3) for > 2 seconds until “Sub-W” appears in the LCD panel. With “Sub-W” displayed, press the knob again 4 times to access the fader control.
VM9510 Operation (continued) AJUSTE DEL RELOJ (HORA) CLOCK DISPLAY Presione y mantenga presionado el botón DISP (5) hasta que el reloj destelle en el panel LCD. Presione el botón ENTER (4) hacia la izquierda o la derecha para ajustar la hora. Presione el botón ENTER hacia arriba o hacia abajo para ajustar los minutos. Continúe cambiando la hora para cambiar de AM a PM. Si no ajusta la hora en 10 segundos, el panel LCD vuelve a la pantalla anterior.
VM9510 Operation (continued) Operación (continuado) System Menu Options Opciones del Menú del Sistema To access the system menu, press the OSD (23) button to display the on-screen menu. Push the ENTER (4) button down to highlight “SYSTEM”, and then press the ENTER button. “AUTO” will become highlighted in red. Push the ENTER button down to highlight the property you want to modify, and then press ENTER. Para acceder al menú del sistema, presione el botón OSD (23) para mostrar el menú en pantalla.
VM9510 Tuner Operation Operación del Sintonizador Switching to Radio Mode Cambio a Modo Radio TFT Screen Closed: Press the MODE button (6) to move through the available modes in the following sequence: FM1, CD, AV1, AV2, and TV1. Stop on “FM1” to access radio mode. The LCD panel displays the current radio station, preset memory number (if applicable), and frequency.
VM9510 Tuner Operation (continued) Operación del Sintonizador (continuado) Manual Tuning Sintonía Manual Presione el botón ENTER (4) hacia arriba o hacia abajo para cambiar el número de la frecuencia de la radio un paso. Push the ENTER button (4) up or down to move the radio frequency number up or down one step. Escaneo Scanning Presione el botón ENTER (4) hacia la derecha para escanear hacia adelante las estaciones potentes de la banda actual.
VM9510 Tuner Operation (continued) Operación del Sintonizador (continuado) Auto Store (AS) / Preset Scan (PS) Almacenaje Automático (AS)/ Escaneo Preestablecido (PS) Almacenaje Automático Automatic Storing Utilice el Almacenaje Automático para seleccionar seis radios potentes y almacenarlas en la banda actual. Use the Auto Store function to select six strong stations and store them in the current band. 1. Select a band (if needed). 2.
VM9510 CD Player Operation Insertar/Expulsar Para insertar un CD, coloque un CD con el lado de etiqueta hacia arriba, dentro de la ranura de CD (15). Para detener el CD y expulsarlo, presione el botón EJECT (16). NOTA: Si el Seguro de Niños está en ON y el disco que se inserta no está autorizado, se debe ingresar un código de 4 dígitos y/o el disco debe ser autorizado (vea"Control de Acceso (DVD/VCD)" en pagina 36). Luego de insertar el disco, la ejecución comienza automáticamente.
VM9510 CD Player Operation (continued) Operación del Equipo de CD (continuado) Fast Forward/Fast Reverse Avance Rápido/Retroceso Rápido Press the 2 button (10) to fast forward. Keep pressing and releasing the button to increase the rate from 2X to 4X, 8X, and 32X. • • Press the 1 button (9) to fast reverse. Keep pressing and releasing the button to increase the rate from 2X to 4X, 8X, and 32X. Presione el botón 2 (10) para avance rápido.
VM9510 MP3 Player Operation Operación del Equipo de MP3 Instructions for Insert/Eject, Play/Pause, Stopping Play, Track Selection, Fast Forward/Fast Reverse, Scan, and Random Play are the same for CD and MP3 operation. Please see the CD Player Operation section for information about these topics. Las instrucciones para Insertar/Expulsar, Ejecutar/Detener, Detener Ejecución, Selección de Pista, Avance Rápido/Retroceso Rápido y Ejecución Aleatoria son las mismas para CD y MP3.
VM9510 MP3 Player Operation (continued) Seleccione Directorio 1. 2. 3. Direct Access (Requires Remote Control) Press the number buttons (1, 2, 3, 4, 5, 6, 7, 8, 9, 0) on the remote control to directly access a track in the current folder. 4. Select Directory button (12) to stop MP3 play. Presione el botón (12) para detener la ejecución de MP3. Presione el botón P.TIME (40) en el control remoto para mostrar el menú principal.
VM9510 DVD Player Operation Operación del Equipo de DVD You must be familiar with the remote control (see the “Remote Controls” diagram on page 9) to perform some of the steps listed in this section. Usted debe conocer el control remoto (vea el diagrama "Controles Remotos" en página 9) para realizar algunos de los pasos descriptos en esta sección. NOTE: When properly installed, DVD video cannot be displayed on the main TFT screen unless the parking break is applied.
VM9510 DVD Operation (continued) Operación del Equipo de DVD (continuado) Adjusting the Position of the TFT Screen Ajustando la Posición de la Pantalla TFT Moving the Screen In/Out Moviendo la Pantalla Adentro / Afuera Press the IN/OUT button (22) to move the screen in or out. You will hear three beep tones. If in the “Out” position, the TFT screen moves to the “In” position. If the TFT screen is “In”, it will move “Out”.
VM9510 DVD Player Operation (continued) Operación del Equipo de DVD (continuado) Manually Adjusting the Angle From Left to Right Ajustando Manualmente el Ángulo Desde Izquierda a Derecha To manually adjust the left/right angle of the TFT screen, follow these steps: Para ajustar el ángulo izquierda o derecha de la pantalla TFT, siga los siguientes pasos: 1. 1. Asegúrese que la pantalla TFT esté afuera en "Out". Presione el botón IN/OUT (22) si es necesario. Extender Mechanism - Fully Extended 2.
VM9510 DVD Player Operation (continued) Avance Rápido/Retroceso Rápido Accessing the DVD Menu Presione el botón 2 (10) para avance rápido. Mantenga presionando y soltando el botón para incrementar la velocidad 2X a 4X, 8X y 32X. Press the MENU button (37) on the remote control to recall the main DVD menu. Use the directional (arrow) buttons ( , , & ) to select a title from the menu. Presione el botón 1 (9) para avance rápido.
VM9510 DVD Operation (continued) Operación del Equipo de DVD (continuado) Direct Search (Requires Remote Control) Búsqueda Directa (Requiere Control Remoto) Title Search Búsqueda de Título 1. Press the P.TIME button (40) on the remote control to display the main menu. 1. Presione el botón P.TIME (40) en el control remoto para mostrar el menú principal. 2. Use the left/right arrows ( & ) on the remote control or the ENTER button (4) on the radio to select the Title (T) option. 2.
VM9510 DVD Operation (continued) Operación del Equipo de DVD (continuado) Time Search Búsqueda de Tiempo (Time Search) 1. Press the P.TIME button (40) on the remote control to display the main menu. 1. Presione el botón P.TIME (40) en el control remoto para mostrar el menú principal. 2. Use the left/right arrows ( & ) on the remote control or the ENTER button (4) on the radio to select the Time Search ( ) option. 2.
VM9510 DVD Operation (continued) Ejecución Cuadro a Cuadro Controlling Playback 1. Presione el botón P.TIME (40) en el control remoto para mostrar el menú principal. 2. Utilice las flechas de izquierda y derecha ( y ) en el control remoto o el botón ENTER (4) en el radio para seleccionar la opción Cuadro a Cuadro ( ). 3. Utilice la flecha hacia abajo ( ) en el control remoto o el botón ENTER (4) en el radio para acceder al cuadrado de Cuadro a Cuadro. 4.
VM9510 DVD Operation (continued) Función de Repetición Seccional (A-B) Utilice la función A-B para definir un área específica de un disco para repetir. Repeat Play (Requires Remote Control) Repeat Chapter, Title, or Disc • Press the REPEAT (44) button on the remote control once to repeat the current chapter. “chapt. • • Presione el botón A-B (43) en el control remoto para configurar el punto de partida (A) de la sección repetida.
VM9510 DVD Operation (continued) 4. Viewing an Alternate Picture Angle (Requires Remote Control) 5. For discs recorded with multiple angles, press the ANGLE button (41) on the remote control to toggle available angles of the on-screen image. 6. Zooming Discos Multi-Lenguaje (Requiere Control Remoto) Use the Zoom function to enlarge and pan through the video image. 1. Press the P.TIME button (40) on the remote control to display the main menu. 2.
VM9510 DVD Operation (continued) Operación del Equipo de DVD (continuado) Setting the Aspect Ratio Configurando el Aspecto Press the ASPECT button (20) to toggle between Wide, Normal, and Cinema aspects. Presione el botón ASPECT (20) para alternar entre aspectos Ancho, Normal o Cine. • Wide = 16:9 ratio • Ancho = radio de 16:9 • Normal = 4:3 ratio • Normal = radio de 4:3 • Cinema = full screen • Cine = pantalla completa NOTA: El botón ASPECTO no trabaja en modo "Tuner".
VM9510 DVD Operation (continued) Main Menu Functions A number of operations can be carried out using the main menu at the top screen. To access the main menu, press the P.TIME button (40) on the remote control. When the menu bar is visible and an item is selected, it will be become highlighted and the appropriate cursor keys to operate will be displayed below the icon. Left/Right arrows indicate more items are available at the left/right of the menu bar.
VM9510 Operación del Equipo de DVD (continuado) Funciones de Menú Principal Un número de operaciones se pueden llevar a cabo utilizando el menú principal de la parte superior de la pantalla. Para acceder al menú principal, presione el botó P.TIME (40) en el control remoto. Cuando una barra de menú es visible y un ítem se selecciona, se marcará y las teclas adecuadas del cursor para manejarlo aparecerán debajo del icono.
VM9510 Operation Platine DVD (continué) Fonctions menu principal Vous pouvez exécuter de nombreuses opérations en utilisant le menu principal en haut de l'écran. Pour accéder au menu principal, appuyez sur le bouton P.TIME (40) sur la télécommande. Lorsque la barre menu est visible et un article a été sélectionné il sera surligné et les clés curseur appropriés pour opérer seront affiché sous l'icône.
VM9510 DVD Operation (continued) 6. Ingrese el código una segunda vez para confirmarlo. 7. Desde el menú "Seguro de Niños", utilice la flecha derecha ( ) para llegar al campo de Bloqueo/Desbloqueo. Child Lock 8. Utilice la flecha hacia arriba para seleccionar el icono de Bloqueo ( ). Activating Child Lock 9. Presione ENTER (4) para confirmar, luego presione la flecha hacia la izquierda ( ) para salir del menú. Access Control (DVD/VCD) 1. Press the P.
VM9510 CD Operation (continued) Operación del Equipo de DVD (continuado) Access Control (DVD/VCD) (continued) Control de Acceso (DVD/VCD) (continuado) Authorizing Discs Autorizando Discos The DVD player maintains a list of 120 authorized (child safe) disc titles. Each time an approved disc is played, the title is placed at the top of the list. Once the list becomes full, new titles are added in place of the last title in the list.
VM9510 CD Operation (continued) Access Control (DVD/VCD) (continued) 2. Ingrese un código de 4 dígitos. 3. Utilice la flecha hacia abajo ( ) para seleccionar el Nivel Paternal. 4. Desde el menú "Nivel Paternal", utilice la flecha derecha ( ) para llegar al campo de Ajuste de Valor. De-authorizing Discs Insert the disc and let playback begin. Press the icon appears and the disc is now de-authorized. button while the 5. icon is visible.
VM9510 CD Operation (continued) Cambiando el País. 1. 2. 3. 4. 5. 6. Access Control (DVD/VCD) (continued) Changing the 4-digit Code 1. Display the “Access Control” menu. (See “Activating Child Lock” on page 36.) 2. Enter your 4-digit code. 3. Use the down arrow ( ) to select Change Code. 4. Use the right arrow ( ) to move to the Change Code field. 5. Enter the new 4-digit code. 6. Enter the code a second time to confirm. 7. Press the down arrow ( ) to exit the menu.
VM9510 TV Operation Operación de TV Switching to TV Mode Cambio a Modo TV Press the MODE button (6) to move through the available modes in the following sequence: FM1, CD, AV1, AV2, and TV1. Stop on “TV” to access TV mode. The TFT screen displays the current station and all six preset memory channels. Presione el botón MODE (6) para moverse a través de los modos disponibles en la secuencia siguiente: FM1, CD, AV1, AV2 y TV1. Deténgase en "TV" para acceder al modo TV.
VM9510 TV Operation (continued) Operación de TV (continuado) Preset Channels (continued) Canales Preconfiguardos (continuado) Storing a Station Almacenando una Estación 1. Select a station. 1. Seleccione una estación. 2. Hold a preset button (9-14) for three seconds. The preset number appears in the LCD panel. 2. Presione el botón de preselección (9-14) por tres segundos. El botón de preselección aparece en el panel LCD.
VM9510 Troubleshooting Specifications CEA Power Ratings Mechanical Errors Power Output: 18 watts RMS X 4 channels into 4-ohms @ < 1% THD+N Signal to Noise Ratio: 70dBA below reference. (Reference: 1 watt, 4-ohms) Dynamic Power: 36 watts @ 4-ohms x 4 channels Frequency Response: 20Hz to 20kHz (-3dB), Audio/Video input used as source reference Reference Supply Voltage: 14.4VDC If a mechanical error occurs while opening the TFT screen, the screen stops moving and beeps three times.
VM9510 Corrección de Problemas Especificationes Calificación de Energía CEA Errores Mecánicos Salida de Energía: Canales 18 watts RMS X4 en 4-ohms @ < 1% THD+N Señal a Coeficiente de Ruido: 70dBA bajo referencia. (Referencia: 1 watt, 4-ohms) Energía Dinámica: 36 watts @ 4-ohms x 4 canales Frecuencia de Respuesta 20Hz a 20kHz (-3dB), entrada de Audio/Video utilizada como fuente de referencia Voltaje de Suministro de Referencia: 14.
VM9510 Dépannage Caractéristiques Classement puissance CEA Des erreurs mécaniques Sortie puissance : 18 watts RMS x 4 chaîne x 4 ohms @ <1% THD+N Rapport signalement à bruit : 70 dBa sous référence (Référence 1 watt, 4ohms) Puissance dynamique : 36 watts @ 4ohms x 4 chaînes Réponse fréquence : 20 hz à 20 Khz (-3dB) entrée Audio/vidéo utilisée comme source référence Voltage alimentation référence : 14.
VM9510 12-Month Limited Warranty Esta Garantía reemplaza a toda otra garantía expresa o implícita. TODA GARANTIA IMPLICITA, INCLUYENDO AQUELLAS GARANTIAS IMPLICITAS DE BUENA CALIDAD Y COMERCIABILIDAD, ESTARA LIMITADA A LA DURACION DE ESTA GARANTIA ESCRITA.